Saturday, January 25, 2025

Building a Cajon with Superior Acoustic Design

The cajon, a simple yet versatile percussion instrument, offers a surprisingly complex world of acoustic engineering. Building your own allows for precise control over its sound, transforming it from a mere box into a finely tuned instrument. This guide provides a detailed approach to constructing a cajon with superior acoustic properties, focusing on the design elements that significantly influence its tone and resonance.

Choosing Your Wood: The Foundation of Sound

The wood you select forms the backbone of your cajon's sound. Hardwoods are generally preferred for their durability and resonant qualities. Consider these options: birch, maple, oak, and mahogany each impart a unique sonic character. Birch, for example, delivers a bright and snappy sound, while mahogany lends a warmer, more mellow tone. The thickness of the wood also affects the sound; thicker walls generally produce a deeper, fuller bass response. Experiment with different thicknesses to achieve your desired sound profile.

Understanding Wood Density and its Impact

Wood density plays a crucial role in the cajon's resonance. Denser woods tend to vibrate less freely, resulting in a tighter, more focused sound. Conversely, less dense woods produce a more resonant, booming sound. Understanding this relationship is key to tailoring the cajon's sound to your personal preference. For instance, a cajon made with dense maple will offer a crisp, articulate sound, perfect for precise rhythms, while a cajon crafted from less dense mahogany will provide a rich, full-bodied tone ideal for a more melodic approach.

Constructing the Sound Chamber: Optimizing Internal Resonance

The interior of the cajon is just as crucial as the exterior wood. The size and shape of the sound chamber significantly impact the overall tone. A larger chamber generally produces a deeper bass response, while a smaller chamber will yield a more focused, snappy sound. You can experiment with internal bracing to further modify the resonance. Avoid excessive bracing, as this can dampen the vibrations and reduce the volume. The goal is to find a balance between structural integrity and optimal resonance.

Internal Bracing and Sound Modification

Strategic internal bracing can subtly shape your cajon's sound. Experiment with the placement and number of braces. Adding braces near the sound hole can enhance the bass response, while braces near the top can influence the slap tone. You should consider using lighter wood for bracing to avoid overly dampening the vibrations. Remember to leave ample space for air movement within the sound chamber for optimal resonance.

Crafting the Snare System: Achieving the Desired Snappy Response

The snare system, responsible for the distinctive "snappy" sound when striking the playing surface, requires careful attention to detail. The most common method is using a set of snare wires strung across the internal back panel. The tension of these wires directly affects the snappy effect. Experiment with different tensions to find the optimal balance between a crisp, articulate snare sound and a comfortable playing experience.

Choosing Snare Wire Gauge and Tension

The gauge (thickness) of the snare wires also contributes to the overall sound. Thicker wires provide a louder, more pronounced snare effect, whereas thinner wires create a subtler, more delicate sound. Adjusting the tension allows for fine-tuning the snare's response, balancing loudness and clarity. Remember to leave some space between the wires for optimal resonance.

By carefully considering these design aspects â€" wood selection, sound chamber dimensions, and snare system configuration â€" you can create a cajon that truly reflects your artistic vision and delivers the precise sonic characteristics you desire. Enjoy the rewarding process of building your custom cajon!

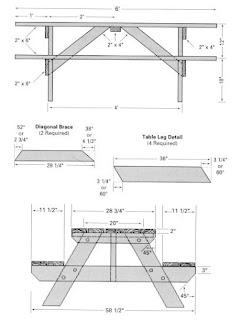
Detailed Woodworking Plan for a Family-Sized Four-Seater Picnic Table

I. Introduction

This document provides a comprehensive woodworking plan for constructing a durable and aesthetically pleasing four-seater picnic table suitable for family use. The design emphasizes straightforward joinery techniques achievable by intermediate-level woodworkers, prioritizing strength and longevity. Detailed dimensions and material lists are provided, alongside step-by-step instructions and illustrations (not included in this text-based plan, but readily imagined or drawn separately). The chosen material is pressure-treated lumber, ensuring weather resistance and minimizing maintenance. This plan prioritizes safety and stability, incorporating robust construction methods to withstand regular use and the elements.

II. Materials List

The following materials are required for this project. Adjust quantities as necessary based on lumber dimensions and potential waste.

A. Lumber:

  • Four 4x4 pressure-treated posts: 30 inches long (legs).
  • Two 2x6 pressure-treated boards: 72 inches long (top supports - lengthwise).
  • Four 2x6 pressure-treated boards: 60 inches long (seat supports - across the length).
  • Two 2x12 pressure-treated boards: 72 inches long (table top).
  • Four 2x12 pressure-treated boards: 60 inches long (table seats).
  • Various scraps of 2x4 pressure-treated lumber: for bracing and reinforcement (quantities to be determined during construction).

B. Hardware:

  • 36 Exterior-grade wood screws: 3 1/2 inches long.
  • 24 Exterior-grade wood screws: 2 1/2 inches long.
  • 8 Exterior-grade carriage bolts: 5/16 inch diameter x 4 inches long (for leg-to-support connection).
  • 8 Washers: to fit carriage bolts.
  • 8 Nuts: to fit carriage bolts.
  • Wood glue (exterior grade): For added strength and water resistance in joints.

C. Tools:

  • Measuring tape and pencil
  • Circular saw or miter saw
  • Drill with various drill bits (including a 5/16 inch drill bit for carriage bolts).
  • Screwdriver (impact driver recommended)
  • Wrench (to tighten carriage bolts)
  • Safety glasses
  • Work gloves
  • Clamps (various sizes)
  • Level
  • Sandpaper (various grits)
  • Wood sealer/stain (optional)

III. Construction Steps

The following steps outline the construction process. Accuracy and precision are crucial at each stage to ensure the final product's structural integrity and aesthetic appeal.

A. Preparing the Legs and Supports:

  1. Cut the four 4x4 posts to 30 inches in length. Ensure all cuts are square and accurate using a miter saw or circular saw and a speed square.
  2. Cut the two 2x6 top supports to 72 inches. These will run the length of the table, forming the frame connecting the legs.
  3. Cut the four 2x6 seat supports to 60 inches. These will span the width of the table, connecting the legs and forming the base for the seats.
  4. Lightly sand all cut edges to remove any splinters or rough surfaces.

B. Assembling the Table Base:

  1. Pre-drill pilot holes at each leg's end to prevent wood splitting when driving in screws. This is especially important with pressure-treated lumber.
  2. Attach the top support beams to the legs using the 3 1/2-inch exterior-grade wood screws. Ensure that the supports are flush against the legs and parallel to each other.
  3. Attach the seat support beams to the legs using the 3 1/2-inch exterior-grade wood screws. Ensure that the seat supports are equally spaced and perpendicular to the top supports.
  4. Reinforce the leg-to-support connections using the carriage bolts. Pre-drill holes for the bolts to prevent splitting. Insert the bolts through the legs and supports, add the washer and nut, and tighten securely.
  5. Check the levelness of the table base; adjust as needed using shims if any legs are uneven.

C. Attaching the Tabletop and Seats:

  1. Cut the two 2x12 boards for the tabletop to 72 inches. Sand all edges thoroughly.
  2. Cut the four 2x12 boards for the seats to 60 inches. Sand all edges thoroughly.
  3. Apply a generous amount of exterior-grade wood glue to the top supports and position the tabletop boards onto the supports.
  4. Secure the tabletop boards to the supports using the 2 1/2-inch exterior-grade wood screws. Space the screws evenly along the length of each board.
  5. Apply a generous amount of exterior-grade wood glue to the seat supports and position the seat boards onto the supports.
  6. Secure the seat boards to the supports using the 2 1/2-inch exterior-grade wood screws, evenly spacing them.

D. Finishing Touches:

  1. Carefully sand all surfaces of the completed picnic table to smooth out any rough edges or imperfections. Start with a coarser grit sandpaper and gradually move to a finer grit for a smoother finish.
  2. Apply a wood sealer or stain (optional) to protect the wood from the elements and enhance its appearance. Follow the manufacturer's instructions for application and drying time. Allow ample drying time before use.
  3. Inspect the entire structure for any loose screws, wobbly legs, or other issues. Tighten any loose screws or make necessary adjustments as needed.

IV. Safety Precautions

Safety is paramount throughout this project. Always wear safety glasses and work gloves. Use caution when operating power tools, following all manufacturer's instructions. Ensure proper ventilation when working with wood stains or sealers. Dispose of sawdust and waste materials responsibly.

V. Conclusion

This detailed plan provides a comprehensive guide for building a sturdy and attractive four-seater picnic table. By following these instructions carefully and utilizing the recommended materials and tools, you can create a lasting piece of outdoor furniture for your family to enjoy for years to come. Remember that accuracy and attention to detail are crucial for a successful outcome. Always prioritize safety and take necessary precautions throughout the construction process.

Wednesday, January 22, 2025

Constructing a Rustic Country Bookshelf: A Comprehensive Guide Utilizing Free Woodworking Plans

This article provides a detailed guide for constructing a rustic country bookshelf, incorporating readily available free woodworking plans. The project emphasizes a straightforward approach, suitable for both novice and experienced woodworkers. The design prioritizes a visually appealing, robust structure that complements various interior styles, emphasizing the inherent beauty of natural wood.

I. Gathering Materials and Tools

Before embarking on the construction, meticulous preparation is paramount. This includes acquiring the necessary materials and tools, ensuring the project progresses smoothly and efficiently. The following sections detail the specific requirements for this rustic country bookshelf.

A. Lumber Selection and Acquisition

The choice of lumber significantly influences the final aesthetic and structural integrity of the bookshelf. For this project, we recommend using reclaimed wood or pine, both readily available and lending themselves well to a rustic finish. Reclaimed wood offers unique character and visual interest, while pine provides a more consistent texture and is generally more affordable. Aim for lumber with minimal knots and warping for ease of construction. The quantity required will depend on the desired dimensions of the bookshelf, referring to the chosen free woodworking plans for precise measurements. Generally, you'll need boards for the shelves, sides, and supports, ensuring sufficient thickness for stability.

B. Essential Hardware and Fasteners

The following hardware is essential for the successful completion of the project:

  • Wood screws: Choose appropriately sized wood screws to securely fasten the various components. Consider using exterior-grade screws for added durability and resistance to moisture.
  • Wood glue: High-quality wood glue enhances the structural integrity of the joints, providing additional strength and preventing movement.
  • Sandpaper: A variety of grits (e.g., 80, 120, 220) are needed for smoothing the surfaces and achieving a fine finish.
  • Wood filler: This will be used to fill any imperfections or gaps in the wood, ensuring a smooth surface for painting or staining.
  • Optional: Depending on your chosen finish, you may require paint, stain, varnish, or other protective coatings.

C. Essential Tools

The following tools are necessary for constructing the bookshelf:

  • Measuring tape and pencil: Accurate measurements are crucial for precise cuts and assembly.
  • Circular saw or hand saw: Used for cutting the lumber to the dimensions specified in the free woodworking plans.
  • Drill with drill bits: Necessary for pre-drilling pilot holes before screwing components together, preventing wood splitting.
  • Screwdriver: For tightening the wood screws.
  • Clamps: To secure the components during assembly and gluing.
  • Safety glasses and hearing protection: Crucial for maintaining a safe working environment.
  • Sanding block or electric sander: For achieving a smooth surface finish.
  • Putty knife: For applying wood filler.
  • Brushes or rags: For applying finishes (if applicable).

II. Utilizing Free Woodworking Plans and Construction Phases

Numerous free woodworking plans are readily available online. Search for "rustic country bookshelf plans" to find a design that aligns with your skill level and desired dimensions. Carefully review the plans before commencing construction. The following phases provide a general outline of the construction process. Specific steps will vary based on the selected plans.

A. Cutting the Lumber

Accurately cut the lumber according to the dimensions specified in your chosen free woodworking plans. Ensure clean, square cuts for proper assembly and a professional finish. Utilize a miter saw or circular saw for precise cuts and a straight edge to guide the saw for optimal accuracy.

B. Assembling the Frame

Following the instructions in your plans, assemble the main frame of the bookshelf. This typically involves joining the vertical side pieces to the horizontal supports. Apply wood glue to the joints before securing them with wood screws. Pre-drill pilot holes to prevent the wood from splitting. Use clamps to hold the components firmly in place while the glue dries.

C. Installing the Shelves

Once the frame is securely assembled and the glue is dry, install the shelves. The shelves can be supported by shelf supports or integrated into the frame's construction. Again, apply wood glue and use screws to fasten the shelves securely in place. Ensure the shelves are level and evenly spaced.

D. Sanding and Finishing

After the assembly is complete, sand all surfaces thoroughly to remove any rough edges or imperfections. Start with a coarser grit sandpaper and gradually progress to finer grits for a smooth finish. Clean the surfaces with a tack cloth to remove dust before applying any finish. Apply your chosen finish â€" paint, stain, or varnish â€" according to the manufacturer's instructions. Multiple coats may be necessary for adequate protection and a rich color.

III. Safety Precautions and Best Practices

Safety should always be prioritized during woodworking projects. Observe the following precautions:

  • Always wear safety glasses to protect your eyes from flying debris.
  • Use hearing protection when operating power tools.
  • Keep your work area clean and organized to prevent accidents.
  • Use clamps to secure workpieces during cutting and assembly.
  • Follow the manufacturer's instructions for all power tools.
  • Ensure proper ventilation when working with paints, stains, and other finishes.

By following these guidelines and utilizing carefully selected free woodworking plans, you can confidently construct a sturdy and aesthetically pleasing rustic country bookshelf that will serve as a functional and decorative addition to any room.

Remember to always consult the specific plans you choose, as the steps and measurements may vary slightly. Enjoy the process and the satisfaction of creating a beautiful piece of furniture with your own hands.

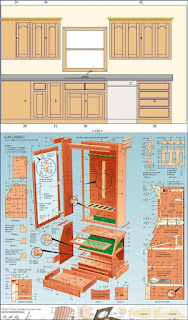
Unlocking Your Vision: Customizable Cabinet Designs for Unique Woodworking Projects

The scent of freshly cut wood, the satisfying rasp of the plane, the pride in crafting something truly unique â€" these are the joys of woodworking. But what if your next project demands more than a standard design? What if you need cabinets that perfectly integrate with a quirky space, showcase your specific needs, or reflect your personal style? This is where customizable cabinet designs become invaluable. Forget mass-produced, cookie-cutter units; embrace the power of personalized woodworking to create cabinets that are as individual as you are.

Beyond the Box: Exploring the Possibilities of Custom Cabinetry

Custom cabinet design opens a world of possibilities. Imagine cabinets perfectly fitted to that awkward alcove in your kitchen, maximizing every inch of space. Picture sleek, modern units seamlessly integrating with your minimalist décor, or rustic, farmhouse-style cabinets adding warmth and character to a cozy cottage. The constraints of standard sizes vanish, replaced by the freedom to create exactly what you envision. This isn't just about functionality; it's about elevating your space with bespoke craftsmanship.

Functionality Tailored to Your Needs

Think beyond simple shelving. Custom cabinets allow you to integrate specialized features that enhance your workflow and storage. Need a pull-out spice rack in your kitchen? A built-in ironing board in your laundry room? Drawers designed specifically for your tools in your workshop? With custom designs, you dictate the functionality, ensuring every detail serves a purpose. We can incorporate clever solutions like hidden compartments, adjustable shelves, soft-close hinges, and specialized hardware to create truly functional and user-friendly storage.

The Design Process: From Inspiration to Installation

Collaborating with a skilled woodworker on your custom cabinet project is a rewarding journey. The process typically begins with a detailed consultation where we explore your vision, needs, and budget. We'll discuss your desired style, materials, finishes, and any specific features you want to incorporate. Detailed measurements are crucial for a perfect fit, ensuring your cabinets integrate seamlessly into their surroundings. Expect thorough sketches and 3D renderings to visualize the final product before any wood is cut.

Choosing the Right Materials and Finishes

The selection of wood species significantly impacts the aesthetic and durability of your cabinets. From the classic warmth of oak and cherry to the modern elegance of walnut and maple, the possibilities are endless. We offer a wide range of wood species, each with unique grain patterns, colors, and properties. Consider factors like durability, resistance to moisture, and the overall aesthetic you desire. Once the wood is chosen, you’ll select a finish that protects the wood and enhances its beauty, from natural stains to vibrant paints.

Crafting Your Unique Style

Your personalized style should shine through in every detail. Consider the hardware: Sleek, modern handles, antique-style knobs, or custom-made pulls can dramatically impact the overall look. Think about incorporating unique features like inlays, carvings, or decorative moldings to add a personal touch. Don't be afraid to experiment and express your individuality; this is your chance to create truly unique cabinets that reflect your personal aesthetic.

Beyond the Kitchen: Expanding the Possibilities

While kitchen cabinets are a popular choice, the versatility of custom designs extends far beyond the culinary space. Imagine a custom media center perfectly housing your entertainment system, or bespoke bathroom vanities that optimize storage and add a touch of luxury. Custom built-ins for your home office can dramatically improve organization and efficiency. The only limit is your imagination!

Ready to transform your space with uniquely crafted cabinets? Contact us today to begin your custom design journey!

Constructing a Safe and Durable Baby Cradle: A Comprehensive Guide

Creating a handcrafted cradle for your newborn is a deeply rewarding project, allowing you to combine personal touch with functionality. This guide provides detailed instructions for constructing a safe and durable cradle suitable for a cherished infant. Remember that safety is paramount; always prioritize adherence to safety guidelines and utilize high-quality materials. This project requires intermediate woodworking skills and the use of appropriate safety equipment.

I. Material Selection and Preparation

Choosing the right materials is crucial for ensuring the cradle's safety, durability, and aesthetic appeal. Avoid using treated lumber as it may contain chemicals harmful to infants.

A. Lumber Selection

Opt for high-quality, untreated hardwood such as maple, cherry, or birch. These woods are strong, durable, and resistant to wear and tear. Select boards that are free from knots, cracks, and other imperfections. The following lumber dimensions are recommended, but can be adjusted based on your desired cradle size:

  • Sides (2 pieces): 1x6 x 36 inches (adjust length as needed)
  • Ends (2 pieces): 1x8 x 24 inches (adjust length as needed)
  • Bottom slats (multiple pieces): 1x2 x 22 inches (adjust length as needed)
  • Legs (4 pieces): 2x4 x 20 inches (adjust length as needed)
  • Support slats (2 pieces): 1x4 x 22 inches (adjust length as needed)

Ensure all lumber is properly dried to prevent warping or cracking. A moisture meter can be used to verify the wood's moisture content, ideally below 8%.

B. Hardware Selection

Select high-quality hardware specifically designed for children's furniture. Avoid using sharp or protruding hardware that could pose a safety risk.

  • Wood screws: Choose #8 or #10 wood screws, appropriate length for the wood thickness.
  • Wood glue: A high-quality wood glue is essential for strong joints.
  • Finishing materials: Select a non-toxic, child-safe finish such as water-based polyurethane or a natural oil finish. Always follow the manufacturer's instructions and allow sufficient drying time before use.
  • Optional: A mattress for the cradle, ensuring it fits snugly and meets all safety standards.

II. Construction Steps

Follow these steps meticulously to ensure a sturdy and safe cradle. Each step should be performed with precision and care.

A. Assembling the Cradle Frame

Begin by assembling the main frame of the cradle. This involves joining the side and end pieces.

  1. Cut the lumber: Precisely cut all lumber pieces to the specified dimensions using a miter saw or hand saw. Ensure accurate measurements to maintain the cradle's structural integrity.
  2. Assemble the sides and ends: Apply wood glue to the joints where the sides and ends meet. Secure the joints using wood screws, countersinking them slightly to prevent them from protruding.
  3. Reinforce the corners: Consider adding corner blocks or braces to reinforce the corners for added strength and stability. This is especially important for the joints connecting the sides and ends.
  4. Clamp and dry: Securely clamp the assembled frame and allow the glue to dry completely according to the manufacturer’s instructions.

B. Installing the Bottom Slats

The bottom slats provide support for the mattress and ensure proper air circulation.

  1. Spacing the slats: Evenly space the bottom slats across the inside width of the cradle frame. Maintain a consistent gap between each slat to ensure proper ventilation. A gap of approximately 1/2 inch is recommended.
  2. Securing the slats: Attach the slats to the inside of the cradle frame using wood screws. Ensure the screws are countersunk and the slats are securely fastened.
  3. Test the fit: After installing the slats, check the stability and ensure the bottom is firmly attached and level.

C. Attaching the Legs and Support Slats

The legs provide stability and elevate the cradle from the floor.

  1. Attaching the legs: Attach the legs to the corners of the cradle frame using wood glue and wood screws. Ensure the legs are evenly spaced and securely fastened for stability.
  2. Adding support slats (optional): For added strength and stability, consider adding support slats between the legs, placed midway along the length of the cradle. Attach these using wood glue and wood screws.

D. Finishing and Safety Checks

The final steps involve finishing the cradle and performing thorough safety checks.

  1. Sanding: Sand all surfaces of the cradle smooth using progressively finer grit sandpaper. Remove any splinters or sharp edges that could pose a safety hazard.
  2. Applying the finish: Apply the chosen child-safe finish according to the manufacturer's instructions. Allow ample drying time between coats. Multiple coats are recommended for durability and protection.
  3. Safety inspection: Conduct a thorough safety inspection, checking for any sharp edges, loose screws, or other potential hazards. Ensure all joints are secure and the cradle is stable.

III. Safety Precautions

Always prioritize safety when constructing and using a baby cradle.

  • Use appropriate safety equipment: Wear safety glasses and a dust mask when sanding and using power tools.
  • Regular inspections: Regularly inspect the cradle for any signs of damage or wear and tear.
  • Proper mattress fit: Ensure the mattress fits snugly within the cradle to prevent the baby from getting trapped.
  • Never leave the baby unattended: Never leave a baby unattended in the cradle.
  • Adhere to safety standards: Familiarize yourself with relevant safety standards and regulations for baby cradles in your region.

By carefully following these instructions and prioritizing safety, you can create a beautiful and functional handcrafted cradle for your baby. Remember that this is a complex project, and seeking assistance from an experienced woodworker may be beneficial, particularly for beginners. Always err on the side of caution to ensure the safety and well-being of your child.

Comprehensive Guide to Free Woodworking Cabinet Plans

This document provides detailed, step-by-step instructions for constructing various types of cabinets using readily available free woodworking plans. These plans are designed to be adaptable to different skill levels, ranging from beginner to intermediate. However, a basic understanding of woodworking tools and safety procedures is assumed. Always prioritize safety and wear appropriate personal protective equipment (PPE) throughout the construction process.

I. Choosing Your Cabinet Project

Before embarking on your cabinet-making journey, it’s crucial to select a project that aligns with your skill level and available resources. Numerous free woodworking plans are available online, catering to a wide spectrum of cabinet types and complexities. Consider the following factors:

A. Cabinet Type

The type of cabinet significantly impacts the complexity of the project. Simple projects include:

  • Basic Shaker-style cabinets: These cabinets feature simple, clean lines and are ideal for beginners.
  • Floating shelves: Relatively straightforward projects that provide excellent practice with joinery techniques.
  • Small storage units: Perfect for honing skills before tackling larger, more intricate projects.

More complex projects include:

  • Detailed face-frame cabinets: Require more precise measurements and joinery skills.
  • Built-in cabinets: Often involve custom sizing and integration with existing structures.
  • Tall pantry cabinets: Demand careful planning and sturdy construction to support significant weight.

B. Wood Selection

The choice of wood greatly influences the final appearance and durability of your cabinets. Common choices include:

  • Pine: An affordable and readily available softwood, relatively easy to work with.
  • Oak: A durable hardwood, offering a classic and elegant look. Can be more challenging to work with.
  • Maple: A strong hardwood, known for its smooth texture and light color. Can also be more challenging to work with.
  • Birch: A relatively hard and strong wood, offering excellent durability.

Consider factors such as budget, desired aesthetic, and the wood's workability when making your selection. Always select appropriately dried lumber to minimize warping and cracking during construction.

II. Essential Tools and Materials

Having the correct tools and materials readily available is critical for a successful woodworking project. While the specific requirements will vary based on the chosen plan, the following list represents a common core set:

A. Tools

  • Measuring tape: Accurate measurements are fundamental to cabinet construction.
  • Pencil: For marking cuts and outlines.
  • Hand saw or circular saw: For cutting lumber to size.
  • Chisels: For fine-tuning cuts and shaping.
  • Drill and drill bits: For creating pilot holes and driving screws.
  • Screwdriver (or impact driver): For fastening cabinet components.
  • Clamps: Essential for holding components together during assembly.
  • Safety glasses and hearing protection: Absolutely crucial for protecting your eyes and hearing.
  • Sandpaper (various grits): For smoothing surfaces and edges.
  • Wood glue: For creating strong and durable joints.
  • Finishing tools (brushes, rags): For applying stain, paint, or varnish.

B. Materials

  • Wood lumber: The quantity and type will depend on your chosen plan.
  • Wood screws: Appropriate size and type for the chosen wood.
  • Wood glue: A high-quality wood adhesive is essential.
  • Finishing materials (stain, paint, varnish): Choose according to your aesthetic preference.
  • Hardware (hinges, handles, knobs): Select based on the cabinet design and personal preference.

III. Step-by-Step Construction Process

The following steps provide a general framework for cabinet construction. Specific instructions will vary depending on the chosen plan. Always refer to your chosen plan for precise dimensions and techniques.

A. Cutting the Lumber

Accurately cut the lumber to the dimensions specified in your chosen plan. Use a measuring tape and pencil to mark the cutting lines. Employ a miter saw or hand saw, ensuring clean, precise cuts. Remember to account for the thickness of the saw blade when marking your cuts.

B. Assembly

Following the plan's instructions, assemble the cabinet components. This may involve various joinery techniques, such as rabbet joints, dado joints, or simple butt joints. Apply wood glue to joints and clamp firmly until the glue is dry. Pre-drill pilot holes before driving screws to prevent wood splitting.

C. Finishing

Once the cabinet is assembled, sand all surfaces smooth using sandpaper of progressively finer grits. Clean the cabinet thoroughly to remove sawdust. Apply your chosen finish (stain, paint, or varnish) according to the manufacturer's instructions. Multiple coats may be necessary for optimal protection and appearance. Allow adequate drying time between coats.

D. Hardware Installation

Finally, install the chosen hardware, such as hinges, handles, and knobs. Ensure that the hardware is properly aligned and securely fastened. Take your time with this step to ensure a professional-looking finish.

IV. Safety Precautions

Woodworking involves inherent risks. Always prioritize safety by adhering to the following precautions:

  • Wear appropriate safety glasses: Protect your eyes from flying debris.
  • Use hearing protection: Reduce noise exposure, especially when using power tools.
  • Keep your work area clean and organized: Reduce the risk of accidents.
  • Use clamps to secure workpieces: Prevent injuries from sudden movements.
  • Disconnect power tools before making adjustments: Prevent accidental starts.
  • Never operate machinery while fatigued or under the influence of drugs or alcohol: Maintain focus and alertness.
  • Properly dispose of sawdust and other woodworking waste: Maintain a clean and safe environment.

By carefully following these steps and prioritizing safety, you can successfully build high-quality cabinets using readily available free woodworking plans. Remember that patience and attention to detail are key to achieving professional-looking results.

Modern Crib Woodworking Plans: Minimalist & Clean Designs

Hey there, fellow woodworking enthusiasts! So, you're thinking about building a crib? That's awesome! There's something incredibly rewarding about crafting something so special for your little one. And let's face it, store-bought cribs can be… well, pricey. Plus, building your own lets you customize the design to perfectly match your nursery's aesthetic. This guide is all about creating a gorgeous, modern crib with clean lines and a minimalist vibe. We'll walk through the whole process, from design considerations to the final sanding. Let's dive in!

Choosing Your Design: Minimalist Meets Safe

Before you even pick up a saw, it's crucial to nail down your design. Minimalist doesn't mean flimsy! Safety is paramount when it comes to cribs. We're talking about meeting (and exceeding!) all relevant safety standards. That means considering things like slat spacing, mattress support, and overall sturdiness.

Here are some key design elements to think about for your minimalist crib:

  • Straight lines and simple shapes: Think clean lines, avoiding fussy details. A rectangular frame with straight slats is a classic minimalist choice.
  • Solid wood selection: Opt for hardwoods like maple, cherry, or oak for durability and a beautiful natural finish. They're strong enough to handle the daily wear and tear a crib endures.
  • Low profile design: A lower-to-the-ground design often feels more modern and can make it easier for parents to reach in and soothe their baby.
  • Adjustable mattress height: While not strictly minimalist, the ability to adjust the mattress height as your baby grows is a huge plus (and adds to the crib's longevity).
  • Concealed hardware: Keep the hardware clean and simple, ideally hidden or recessed to maintain that sleek, minimalist look.

Gathering Your Materials and Tools

Alright, let's get organized! Building a crib requires precision, so having all your materials and tools ready will make the process smoother. Here's a basic list. Remember to adjust quantities based on your specific design:

  • Wood: Hardwood lumber (maple, cherry, oak â€" your choice!), cut to the dimensions specified in your plans. Don't skimp on quality here!
  • Wood glue:** A high-quality wood glue is essential for strong joints.
  • Screws:** Use screws specifically designed for wood, and choose lengths appropriate for the thickness of your lumber.
  • Wood dowels (optional): These can add extra strength to certain joints.
  • Sandpaper:** Various grits for smoothing the wood (starting with coarser grits and ending with finer ones).
  • Finish:** Your choice of stain, paint, or clear sealant. Consider a non-toxic, child-safe finish.
  • Measuring tape and square:** Accurate measurements are crucial for a well-built crib.
  • Drill:** A drill with various drill bits.
  • Screwdriver:** A good quality screwdriver (or a drill with a screwdriver bit) is essential.
  • Safety glasses and dust mask:** Protect yourself from flying debris and wood dust.
  • Clamps:** Many clamps of varying sizes to hold pieces together while the glue dries.
  • Planer (optional): A planer can help ensure perfectly flat surfaces.

Step-by-Step Construction: A General Outline

This part is where things get really specific, and I can't provide exact instructions without a detailed plan. However, I can give you a general overview of the process. Remember, always refer to your chosen plans for precise measurements and techniques.

Building the Frame

Most crib designs start with building the main frame. This typically involves assembling the headboard, footboard, and side rails. You'll likely use mortise and tenon joints, pocket holes, or a combination of techniques. Make sure your joints are tight and secure. Always double-check your measurements and alignment before securing any joints permanently.

Adding the Slats

Once the frame is built, you'll add the slats. This is where you need to pay close attention to safety regulations regarding slat spacing. The space between slats must be small enough to prevent your baby from getting their head or body stuck. Your plans will specify the correct spacing.

Attaching the Mattress Support

The mattress support is critical. It needs to be sturdy and level to ensure a safe sleeping surface. Many cribs use adjustable mattress supports, allowing you to lower the mattress as your child grows. Follow your plans carefully for this part.

Finishing Touches

Once the crib is assembled, it's time for sanding and finishing. Sand all surfaces thoroughly, starting with coarser grits and moving to finer ones, to achieve a smooth finish. Apply your chosen finish â€" stain, paint, or sealant â€" according to the manufacturer's instructions. Make sure your finish is child-safe and non-toxic.

Safety First: Crucial Considerations

I cannot stress this enough: Safety is your top priority. Before you even think about letting your little one anywhere near the crib, make sure it meets all relevant safety standards. Here are some key points:

  • Slat spacing:** Check and double-check your slat spacing to ensure it conforms to safety regulations. This is crucial to prevent your baby from getting trapped.
  • Hardware:** Use appropriate hardware (screws, etc.) and make sure they are securely fastened. Consider countersinking screws to avoid any sharp edges.
  • Stability:** The crib must be rock-solid and stable. There should be no wobbling or movement.
  • Finish:** Use a non-toxic, child-safe finish that is free from harmful chemicals.
  • Mattress:** Ensure that you use a properly fitting mattress that does not leave gaps between the mattress and the crib rails.

Consider consulting with a professional if you have any doubts about the safety of your crib.

Commonly Asked Questions

  • Q: Where can I find plans for a minimalist crib? A: You can find plans online through various woodworking websites and blogs. Etsy is also a great resource for both plans and pre-made crib kits. Remember to thoroughly check the safety of any plan before starting construction.
  • Q: What kind of wood is best for a crib? A: Hardwoods like maple, cherry, and oak are ideal for their durability and strength. Avoid softer woods that might be easily damaged.
  • Q: How long does it take to build a crib? A: The time required varies depending on your experience level and the complexity of the plan. Expect to spend several days, perhaps a week or more, depending on your schedule.
  • Q: Do I need any special tools? A: A good quality drill, measuring tape, clamps, and sandpaper are essential. A planer and other more advanced woodworking tools can be helpful, but aren't strictly necessary.
  • Q: Is it really safe to build my own crib? A: Building your own crib can be perfectly safe, provided you follow detailed, reputable plans and pay close attention to safety regulations. If you have any doubts, consult a professional before starting.

Building a crib is a big project, but the sense of accomplishment and the satisfaction of creating something beautiful and safe for your baby are truly priceless. Happy building!

Rustic Crib Woodworking: Building a Cozy Nursery Haven

Hey there, fellow DIY enthusiasts and soon-to-be parents! So you're dreaming of a rustic nursery, filled with the warmth of natural wood and the comforting scent of freshly-planed lumber? That's awesome! Building a rustic crib yourself is a fantastic way to add a truly unique and personal touch to your little one's room. It's a labor of love, sure, but the end result? Priceless. Let's dive into some ideas to get those creative woodworking juices flowing!

Choosing Your Wood and Style

The first big decision is picking your wood. Think about the overall feel you want. Are we going for a rugged, reclaimed look? Something a little more refined and elegant, still rustic, but a bit more polished? The wood choice hugely influences the final aesthetic.

Popular Rustic Wood Choices:

  • Reclaimed wood: This adds serious character. Think old barn wood, repurposed pallets (ensure they're treated properly!), or even reclaimed flooring. The imperfections, knots, and variations in color tell a story. Just be sure to check for any potential hazards before using reclaimed wood in a crib.
  • Pine: A classic choice for its affordability, workability, and slightly rustic feel. Knotty pine adds even more character. It's relatively soft, so handle with care to avoid dents and scratches during construction and use.
  • Oak: For a more durable and refined rustic look, oak is a strong contender. It’s harder than pine, meaning it'll stand up to the wear and tear of a growing child. White oak is particularly beautiful, though it’s a bit more expensive.
  • Cedar: The natural scent of cedar is wonderfully calming and insect-repellent, making it a popular choice for nurseries. It's also fairly durable and has a lovely grain. Note that it can be a little more challenging to work with than pine.

Beyond the wood type, consider the style. Do you envision a simple, Shaker-inspired crib with clean lines? Or something more elaborate, perhaps with carved details or unique joinery? Browse online for inspiration â€" Pinterest is a goldmine for rustic crib designs!

Design Considerations for Safety

Safety is paramount when building a crib. This isn't a project to take lightly. You absolutely must adhere to all relevant safety standards for cribs. This includes slat spacing, mattress support firmness, and overall structural integrity.

Crucial Safety Aspects:

  • Slat Spacing: The distance between crib slats must be between 2 3/8 inches and 2 3/4 inches to prevent your baby’s head from getting stuck.
  • Mattress Support: The mattress support must be firm and level to prevent suffocation. Avoid any sagging or gaps.
  • Hardware: Use only high-quality, child-safe hardware. Screws should be countersunk and smooth to prevent injury.
  • Finishes: Use only non-toxic, child-safe finishes and paints. Look for products labeled as specifically safe for cribs and children's toys. Always follow the manufacturer's instructions carefully and allow adequate drying time before assembly.
  • Sharp edges and corners: Ensure all edges and corners are smooth and rounded to avoid injuries. Sand everything thoroughly!

Consider consulting with a qualified carpenter or woodworker if you’re unsure about any aspect of the construction process. It's better to be safe than sorry when it comes to your baby's safety. Don’t hesitate to seek expert advice!

Adding Rustic Charm: Design Ideas

Now for the fun part: infusing your crib with rustic charm! Here are some ideas to elevate your design beyond the basics:

Rustic Design Elements:

  • Distressed Finish: A slightly weathered or distressed finish can add a beautiful aged look. You can achieve this with various techniques, from sanding to applying a special distressing stain.
  • Wood Burning: Intricate wood-burned designs can add a personalized touch. Consider adding your baby's name, birthdate, or a simple nature-inspired motif.
  • Metal Accents: Incorporate rustic metal accents, like antique-style hinges or drawer pulls, for a touch of contrast and visual interest.
  • Natural Fabrics: Pair your rustic crib with natural fabrics like linen or cotton for bedding and blankets. These will complement the wood beautifully and create a warm, inviting atmosphere.
  • Unique Joiners: Explore different joinery techniques like mortise and tenon or dovetail joints. These add strength and a visually interesting element to your design.

Building Your Crib: A Step-by-Step (Simplified) Approach

This is a simplified overview, remember â€" detailed plans are essential for building a safe and sturdy crib. You’ll need detailed plans, appropriate tools (table saw, planer, router, etc.), and a solid understanding of woodworking techniques.

  1. Plan and Design: Acquire detailed plans that meet all safety standards. Don’t skip this step!
  2. Cut the Wood: Precisely cut all your wood pieces according to the plans.
  3. Assemble the Frame: Carefully assemble the crib frame, using appropriate joinery and hardware.
  4. Install Slats: Secure the slats to the frame, ensuring proper spacing.
  5. Attach Mattress Support: Install a sturdy and level mattress support.
  6. Sanding and Finishing: Thoroughly sand all surfaces to remove splinters and burrs. Apply a child-safe finish.
  7. Final Inspection: Before letting your baby sleep in it, conduct a thorough final inspection to ensure everything is safe and secure.

Commonly Asked Questions

Let's address some common queries about building a rustic crib:

  • Q: Is it really safe to build a crib myself? A: Yes, but only if you follow detailed plans, adhere strictly to safety standards, and possess the necessary woodworking skills. If you have any doubts, seek expert help.
  • Q: How long does it take to build a rustic crib? A: This depends on your skill level and the complexity of the design. Expect to spend several days, possibly even weeks, on the project.
  • Q: How much will it cost? A: The cost varies based on the wood type, hardware, and finish you choose. It can be cheaper than buying a commercially made crib, but factor in the cost of materials and tools.
  • Q: Where can I find plans? A: You can find plans online, in woodworking magazines, or from specialized woodworking stores. Ensure the plans meet all safety standards.
  • Q: What if I make a mistake? A: Mistakes happen! Carefully assess the error. Sometimes, small mistakes are easily fixable. If it's a major issue, don't hesitate to seek advice or start over.

Building a rustic crib is a challenging but rewarding project. Remember to prioritize safety and take your time. The result will be a beautiful and unique piece of furniture that you and your little one will cherish for years to come. Happy building!

Maximizing Vertical Space: A Comprehensive Guide to Efficient Floating Shelf Designs

In contemporary interior design, the strategic utilization of vertical space is paramount. Limited floor area necessitates creative solutions to accommodate storage and display needs. Floating shelves, with their elegant aesthetic and space-saving capabilities, present a versatile answer to this challenge. This comprehensive guide explores diverse floating shelf designs, emphasizing their efficiency in optimizing vertical real estate while enhancing the overall visual appeal of a room.

Understanding the Advantages of Floating Shelves

Floating shelves offer numerous advantages over traditional shelving units. Their streamlined profile contributes to a sense of spaciousness, particularly in smaller rooms. The absence of visible supports creates a clean, modern look that complements a wide range of interior styles, from minimalist to eclectic. Furthermore, floating shelves:

  • Maximize vertical space: They utilize wall space often left unused, providing additional storage and display areas without encroaching on floor space.
  • Enhance visual appeal: Their sleek design adds a contemporary touch and can serve as a focal point in a room, showcasing cherished items or artwork.
  • Offer design flexibility: Floating shelves are available in various materials, sizes, and finishes, allowing for customization to suit individual preferences and décor.
  • Easy installation: While professional installation is recommended for larger or heavier units, many floating shelves are designed for simple DIY installation.
  • Versatile functionality: They can serve as bookshelves, display shelves for decorative objects, storage for media devices, or even as a stylish alternative to a bedside table.

Categorizing Floating Shelf Designs for Optimized Space Use

The effectiveness of floating shelves in maximizing vertical space depends significantly on their design and placement. Several categories of floating shelf designs cater to specific needs and aesthetic preferences:

Single-Tier Floating Shelves

These are the simplest form of floating shelves, ideal for smaller spaces or areas needing only minimal storage. Their compact size allows for strategic placement above desks, in hallways, or even in bathrooms for toiletries. The minimal design ensures they don't overwhelm the space while providing a functional surface.

Multi-Tiered Floating Shelves

For increased storage capacity, multi-tiered floating shelves are an excellent option. These designs stack multiple shelves vertically, creating a significant storage solution in a relatively small wall area. Careful consideration should be given to the spacing between tiers to allow for easy access and to prevent the shelves from feeling cluttered.

Corner Floating Shelves

Corner floating shelves ingeniously utilize often-neglected corner spaces. These shelves are specifically designed to fit snugly into corners, maximizing the utilization of otherwise unused areas. They can add visual interest to a room while providing additional storage, particularly useful in smaller rooms or apartments.

L-Shaped and U-Shaped Floating Shelves

L-shaped and U-shaped floating shelves offer a more substantial storage solution than single-tier options. They maximize wall space by extending along two adjacent walls, creating a larger surface area for storage and display. This design is particularly suitable for living rooms, home offices, or bedrooms where substantial storage is required.

Floating Shelves with Integrated Features

Some advanced designs incorporate integrated features to enhance functionality. Examples include shelves with built-in lighting, creating a dramatic display effect for collectibles or books. Others may incorporate hidden compartments or drawers for increased storage capacity, concealing items while maintaining the sleek aesthetic of the floating shelf.

Materials and Finishes: Impact on Design and Efficiency

The choice of materials and finishes significantly impacts the overall look and functionality of floating shelves. Different materials offer various levels of durability, aesthetic appeal, and weight-bearing capacity:

  • Wood: A classic and versatile choice, offering warmth and natural beauty. Different wood types, finishes, and stains allow for customization to match any interior style.
  • Metal: Offers a modern and industrial aesthetic. Metal shelves are typically sturdy and durable but require careful consideration of the weight capacity.
  • Glass: Creates a sleek and minimalist look, perfect for modern interiors. Glass shelves allow light to pass through, making them ideal for showcasing decorative objects.
  • Acrylic: A lightweight and transparent option offering a modern and clean aesthetic. Acrylic shelves are durable and easy to clean.

The finish further enhances the shelf's aesthetic appeal and durability. Options include stained wood, painted finishes, powder-coated metal, and polished glass. The chosen finish should complement the overall décor of the room.

Strategic Placement and Arrangement for Optimal Space Utilization

The strategic placement and arrangement of floating shelves are crucial for maximizing their space-saving potential. Consider the following factors:

  • Wall space assessment: Identify areas with ample wall space that are not already occupied by furniture or other fixtures.
  • Visual balance: Distribute shelves evenly to create a balanced and visually appealing arrangement. Avoid overcrowding a single area.
  • Accessibility: Ensure shelves are placed at a comfortable height for easy access and retrieval of items.
  • Weight capacity: Select shelves with appropriate weight capacity to prevent overloading and potential damage.
  • Room functionality: Consider the room's purpose when placing shelves. For example, in a kitchen, place shelves within reach for frequently used items.

Conclusion: Elevating Interior Design with Efficient Floating Shelves

Floating shelves represent a powerful design solution for maximizing vertical space and enhancing the aesthetic appeal of any room. By understanding the various design options, material choices, and strategic placement techniques, homeowners and interior designers can leverage these versatile elements to create functional and visually stunning interiors. The careful consideration of design, material, and placement allows floating shelves to transcend mere storage solutions, transforming into elegant focal points and integral components of a well-designed living space.

Rustic Wooden Wall Shelf Plans for Natural Charm

This comprehensive guide provides detailed plans for crafting rustic wooden wall shelves, imbuing your living space with natural charm and handcrafted elegance. The plans cater to varying skill levels, from novice DIY enthusiasts to experienced woodworkers, offering adaptable designs and techniques to achieve a personalized aesthetic.

Choosing Your Timber: A Foundation of Rustic Elegance

The selection of wood significantly influences the final aesthetic and durability of your rustic wall shelf. Opting for reclaimed wood offers a unique patina and adds a layer of character, reflecting its history. Alternatively, newly sourced wood species such as pine, cedar, or oak provide versatile options, each with distinct grain patterns and tonal variations.

Reclaimed Wood: Character and Sustainability

Reclaimed wood, salvaged from old buildings, barns, or pallets, presents a wealth of character. Its weathered surface, imbued with the marks of time, imparts an undeniable rustic charm. However, working with reclaimed wood necessitates careful consideration. Inspect the wood for rot, warping, or insect infestation. Thorough cleaning and treatment might be required before construction.

Newly Sourced Wood: Consistency and Control

Newly sourced wood offers greater control over the final appearance and structural integrity. Pine, known for its affordability and ease of working, is an excellent choice for beginners. Cedar, with its natural insect-repelling properties, is ideal for outdoor or moisture-prone areas. Oak, though more demanding to work with, offers superior strength and a refined grain pattern that ages beautifully.

Design Considerations: Tailoring Your Shelf to Your Space

Before embarking on the construction, meticulously plan the shelf's dimensions, style, and placement. Consider the weight capacity required, the available wall space, and the overall aesthetic you wish to achieve. Sketching preliminary designs helps visualize the final product and identify potential challenges.

Single Shelf vs. Multi-Shelf Units

A single, floating shelf provides a minimalist aesthetic, perfect for showcasing a few prized possessions. Conversely, multi-shelf units offer greater storage capacity and visual interest. The number of shelves, their spacing, and overall dimensions should be carefully considered based on your storage needs and the available wall space.

Shelf Depth and Width: Balancing Form and Function

The shelf depth determines the amount of space available for displaying items. A deeper shelf accommodates larger objects, while a shallower shelf provides a more delicate, less cluttered appearance. The width should be proportionate to the length of the wall space and the overall design aesthetic. Consider the weight of the items to be stored when determining the shelf's depth and width.

Bracket Selection: Aesthetics and Structural Integrity

The choice of brackets significantly impacts the overall visual appeal and structural integrity of the shelf. Rustic metal brackets complement reclaimed wood, creating a blend of industrial and natural elements. Alternatively, simple wooden brackets, crafted from the same wood as the shelf, create a unified and seamless design. Ensure that the chosen brackets are robust enough to support the anticipated weight of the items placed on the shelf.

Tools and Materials: Gathering Your Arsenal

Careful preparation is key to a successful project. Ensure you have all necessary tools and materials before commencing construction. A comprehensive list will vary depending on the chosen design and wood type but generally includes:

  • Wood: Reclaimed or newly sourced wood, cut to the required dimensions.
  • Brackets: Metal or wooden brackets, selected based on design preference and weight capacity.
  • Wood screws: Appropriate size and length for securing brackets and shelves.
  • Wood glue:
  • For added strength and stability.
  • Measuring tape:
  • For accurate measurements and cuts.
  • Saw (circular saw or hand saw):
  • For cutting the wood to size.
  • Drill:
  • For pre-drilling pilot holes and securing screws.
  • Sandpaper:
  • For smoothing edges and surfaces.
  • Wood stain or sealant:
  • For protecting the wood and enhancing its natural beauty. (Optional)
  • Level:
  • For ensuring the shelf is installed perfectly level.
  • Stud finder:
  • To locate wall studs for secure mounting.

Construction Techniques: Bringing Your Vision to Life

The construction process involves several key steps, each demanding precision and attention to detail. The specific steps may vary depending on the complexity of the design, but the fundamental principles remain consistent.

Cutting the Wood to Size

Using your carefully measured dimensions, cut the wood to the required length and width. Ensure clean, straight cuts for optimal aesthetics and structural integrity. For reclaimed wood, you may need to address existing imperfections before cutting.

Attaching the Brackets

Secure the brackets to the wall studs using appropriate screws. Pre-drilling pilot holes prevents wood splitting. Use a level to ensure the brackets are perfectly aligned and level. This step is critical to the shelf's stability and overall appearance.

Attaching the Shelf

Carefully position the shelf onto the brackets, ensuring proper alignment. Secure the shelf to the brackets using wood screws and wood glue for added strength. Pre-drilling pilot holes minimizes the risk of wood splitting and ensures a clean, professional finish.

Finishing Touches

Once the shelf is securely attached, sand down any rough edges or imperfections. Apply a wood stain or sealant to protect the wood from moisture damage and enhance its natural beauty. Allow sufficient drying time before loading the shelf with your prized possessions.

Safety Precautions: Prioritizing Safety During Construction

Safety should be a paramount concern throughout the construction process. Always wear appropriate safety gear, including safety glasses and gloves. Use caution when operating power tools, ensuring they are in good working order and used according to manufacturer's instructions. Take extra precautions when working with reclaimed wood, as it may contain splinters or sharp edges.

By following these detailed plans and prioritizing safety, you can successfully construct rustic wooden wall shelves that add natural charm and handcrafted elegance to your home. Remember to adapt the plans to your specific needs and aesthetic preferences, allowing your creativity to shine through in the final product.

Free Cantilever Pergola Blueprints for Open-Air Spaces

This document provides comprehensive information regarding the design and construction of free cantilever pergola blueprints suitable for various open-air spaces. It details the essential considerations for safe and aesthetically pleasing structures, offering guidance for both novice and experienced builders. While these blueprints are offered as a free resource, it is crucial to remember that professional consultation is recommended for complex projects or those involving unique site conditions. Always prioritize safety and adherence to local building codes and regulations.

Understanding Cantilever Pergola Design

A cantilever pergola is distinguished by its unique support system, where one end of the structure is affixed to a supporting wall or post, while the other end extends freely, creating a floating, visually striking effect. This design offers several advantages, including:

  • Enhanced Aesthetics: The clean lines and open feel contribute to a modern and elegant design.
  • Maximized Space: Unlike traditional pergolas with central supports, cantilever designs offer unobstructed floor space beneath.
  • Versatility: They can be adapted to various sizes and styles, integrating seamlessly into diverse outdoor environments.

However, it's essential to understand the inherent complexities:

  • Structural Integrity: The cantilever design demands robust engineering to ensure stability and prevent sagging or collapse. Careful consideration of beam size, material selection, and anchoring methods is paramount.
  • Increased Material Costs: Larger, stronger beams are typically required compared to traditional pergola designs, potentially increasing material costs.
  • Installation Challenges: Precise measurements and skillful installation are vital to ensure the structural integrity and longevity of the pergola.

Essential Blueprint Considerations

Before commencing any construction, thorough planning is crucial. The following aspects require careful consideration:

Site Assessment and Design

Conduct a comprehensive site assessment, noting factors such as:

  • Available Space: Determine the exact dimensions of the area where the pergola will be built, ensuring sufficient clearance from surrounding structures and landscaping.
  • Sunlight and Shade: Consider the sun's path throughout the day to optimize shade coverage and minimize direct sunlight exposure in desired areas.
  • Wind Exposure: Evaluate the prevailing wind direction and strength. This will influence the design and material selection to ensure stability.
  • Ground Conditions: Assess soil type and stability for proper foundation design. Consider soil drainage and potential for frost heave in colder climates.
  • Building Codes and Regulations: Consult local building codes and obtain necessary permits before construction begins. This step is crucial to ensure compliance and safety.

Material Selection

Choosing the right materials is vital for both aesthetics and structural integrity. Common options include:

  • Wood: Offers a classic and natural aesthetic. Durable hardwoods like cedar or redwood are preferred for their resistance to rot and decay. Proper treatment is crucial for longevity.
  • Metal: Aluminum and steel offer strength and low maintenance. Aluminum is lightweight and rust-resistant, while steel provides exceptional strength but requires protective coatings to prevent corrosion.

Consider the following factors when making your selection:

  • Durability: Choose materials that can withstand the elements, including rain, sun, and wind.
  • Maintenance: Assess the long-term maintenance requirements of each material. Wood may require regular sealing or staining, while metal may require occasional cleaning and repainting.
  • Cost: Compare the cost of various materials and factor in the cost of treatment, installation, and potential future maintenance.

Structural Calculations and Engineering

Accurate structural calculations are essential for a safe and stable cantilever pergola. These calculations determine the required beam size, support structure design, and anchoring methods. While free blueprints can provide a starting point, it's strongly recommended to consult a structural engineer, particularly for larger or more complex designs. Incorrect calculations can lead to structural failure, posing a significant safety risk.

Detailed Drawings and Specifications

Detailed blueprints should include comprehensive drawings and specifications, such as:

  • Site Plan: Illustrating the pergola's location on the property and its relationship to surrounding structures.
  • Foundation Plan: Detailing the type and dimensions of the foundation required.
  • Framing Plan: Showing the layout and dimensions of the beams, posts, and other structural elements.
  • Material List: Providing a comprehensive list of all materials needed, including quantities and specifications.
  • Assembly Instructions: Step-by-step instructions for assembling and installing the pergola.

Accessing and Utilizing Free Blueprints

Numerous online resources offer free pergola blueprints. However, it's essential to exercise caution and verify the credibility of the source. Look for blueprints that include detailed drawings, specifications, and clear instructions. Be wary of plans lacking essential structural information or those that appear hastily created. Always double-check dimensions and ensure they are compatible with your site conditions and chosen materials. Remember to adapt the blueprints to your specific needs and consult with professionals as necessary.

Disclaimer

The information provided in this document is for informational purposes only and should not be considered a substitute for professional engineering advice. The use of any free blueprints provided online is entirely at the user's own risk. Always prioritize safety and consult with qualified professionals when necessary to ensure compliance with building codes and regulations. The authors and publishers of this document are not responsible for any damages or injuries resulting from the use of free blueprints or the information contained herein.

Wooden 16x20 Pergola Plans for a Stunning Garden Feature

This comprehensive guide provides detailed plans for constructing a magnificent 16x20 foot wooden pergola, transforming your garden into a breathtaking outdoor oasis. The design emphasizes both aesthetic appeal and structural integrity, offering a robust and visually stunning feature that will enhance your property for years to come. Careful consideration has been given to material selection, construction techniques, and finishing details, ensuring a project that is both rewarding and achievable for experienced DIY enthusiasts.

I. Design Considerations and Planning

Before commencing construction, meticulous planning is crucial. This involves several key steps to ensure the pergola aligns with your garden's aesthetic and structural requirements.

A. Site Selection and Preparation

The chosen location significantly impacts the pergola's effectiveness and visual integration. Consider factors such as sunlight exposure, proximity to existing structures, and drainage. Ensure the area is level and free from obstructions. A thorough site survey, including ground preparation and potential underground utilities, is paramount. This may involve excavation to establish a stable foundation.

B. Material Selection

The longevity and aesthetic appeal of your pergola are directly influenced by the quality of materials used. Pressure-treated lumber is recommended for its resistance to rot and insect infestation. Cedar or redwood offer exceptional durability and natural beauty, although at a higher cost. Consider the following:

  • Posts: 6x6 pressure-treated lumber or equivalent, ensuring sufficient height and stability.
  • Beams: 4x6 pressure-treated lumber or equivalent, providing the primary structural support for the rafters.
  • Rafters: 2x4 or 2x6 pressure-treated lumber, spaced according to design specifications for optimal structural integrity and aesthetic balance.
  • Lattice (Optional): Choose from a variety of materials, including wood, vinyl, or composite, depending on desired aesthetic and maintenance requirements.
  • Fasteners: Use galvanized or stainless steel screws and bolts to prevent rust and ensure longevity.

C. Permitting and Regulations

Check with your local authorities regarding building permits and regulations before starting construction. Depending on your location, specific regulations may apply regarding structure height, setbacks from property lines, and adherence to building codes. Failure to obtain necessary permits may result in fines or even demolition.

II. Foundation and Post Installation

A robust foundation is crucial for the structural integrity and longevity of the pergola. This section details the process of establishing a solid base for the supporting posts.

A. Foundation Options

Several foundation options exist, each with its advantages and disadvantages. Consider the following:

  • Concrete Footings: Provide the most stable foundation, ideal for heavier pergolas or areas with unstable soil. This involves excavating holes, placing gravel, and pouring concrete footings to secure the posts.
  • Metal Post Bases: Offer a faster and less labor-intensive alternative to concrete footings. These bases are anchored to the ground and provide a secure mounting point for the posts.
  • Ground Anchors: Suitable for lighter pergolas and stable soil conditions. These anchors are driven into the ground and provide a secure connection for the posts.

B. Post Placement and Setting

Accurate post placement is critical for ensuring a level and structurally sound pergola. Use string lines to mark the locations of the posts, ensuring proper spacing and alignment. The posts should be plumb and secured firmly to the foundation using appropriate fasteners. Consider using concrete or post anchors for enhanced stability. Ensure that the posts are set at the correct depth to accommodate the beams and rafters.

III. Beam and Rafter Installation

Once the posts are securely in place, the beams and rafters can be installed to create the primary structural framework of the pergola.

A. Beam Attachment

The beams are the horizontal supports that rest on top of the posts. Secure the beams to the posts using strong galvanized or stainless steel bolts and brackets. Ensure that the beams are level and properly aligned before tightening the fasteners. Use appropriate shims to adjust for any irregularities in the posts or ground.

B. Rafter Installation

The rafters are the sloped members that span between the beams, creating the roof structure. Space the rafters evenly according to your design specifications. Secure the rafters to the beams using galvanized or stainless steel screws. Use appropriate construction methods, such as overlapping rafters or using connecting brackets, to ensure stability and prevent movement.

C. Lattice Installation (Optional)

If desired, install lattice panels between the rafters for added shade and privacy. Attach the lattice panels using appropriate fasteners, ensuring they are securely fastened to the rafters.

IV. Finishing Touches and Considerations

The final stage involves adding the finishing touches to complete your pergola project, enhancing both aesthetics and longevity.

A. Sanding and Finishing

Sand all lumber surfaces smooth to create a professional finish. Apply a high-quality wood sealant or stain to protect the wood from the elements, enhancing its lifespan and aesthetic appeal. Choose a finish that complements your garden's style and the overall aesthetic of your home.

B. Adding Accessories

Consider adding accessories to enhance the functionality and aesthetic appeal of your pergola. Options include hanging lights, potted plants, climbing vines, or a ceiling fan for comfort during warmer months. Choose accessories that complement the design and style of your pergola.

C. Regular Maintenance

Regular maintenance is vital to preserve the beauty and longevity of your pergola. Periodically inspect the structure for any signs of damage or deterioration. Re-apply sealant or stain as needed to protect the wood from the elements. Clean the pergola regularly to remove dirt and debris. Prompt attention to any issues will extend the lifespan of your investment.

By following these detailed plans and adhering to best practices, you can successfully construct a stunning 16x20 foot wooden pergola, transforming your garden into a beautiful and functional outdoor space. Remember to prioritize safety throughout the construction process and consult with professionals when necessary. Enjoy the process and the rewarding results of your hard work.

Tuesday, January 21, 2025

Crafting the Functional Kitchen: Woodworking's Role in Modern Design

The kitchen, once a purely utilitarian space, has evolved into the heart of the home. It's where families gather, friends connect, and culinary creativity flourishes. This transformation demands furniture that reflects this multifaceted role â€" pieces that are not only beautiful but also incredibly functional. Woodworking, with its inherent ability to blend form and function, plays a crucial role in crafting kitchens that are both aesthetically pleasing and highly efficient. This article explores the unique contributions of functional woodworking to the modern kitchen.

The Allure of Wood: Materiality and Aesthetics

Wood’s natural warmth and beauty instantly elevate any space. Unlike cold, sterile materials, wood brings a sense of organic comfort to the kitchen. The grain patterns, the subtle variations in color, and the inherent texture of the wood create a visual richness that's impossible to replicate. Think of the rich, deep tones of a cherry island, the rustic charm of a reclaimed pine shelving unit, or the sleek modernity of a walnut butcher block countertop. These aren't just surfaces; they're statements, reflecting the homeowner's personality and taste. Moreover, carefully chosen wood types offer durability and longevity, promising years of reliable service within the often demanding kitchen environment.

Beyond the Surface: Choosing the Right Wood

Selecting the right wood is paramount. Hardwoods like maple, oak, and hickory offer exceptional durability and resistance to scratches and dents, ideal for high-traffic areas and surfaces subjected to heavy use. Softwoods like pine or fir, while less resilient, can offer a more rustic aesthetic and work beautifully for open shelving or less-used elements. Consider the wood's natural properties â€" its resistance to moisture, its ease of maintenance, and its overall aesthetic compatibility with your kitchen's design scheme. A skilled woodworker can guide you through these choices, ensuring the selected wood perfectly complements your vision.

Functional Design: Maximizing Space and Efficiency

Functional woodworking isn't just about aesthetics; it's about smart design solutions. A skilled craftsperson understands the nuances of kitchen workflow and can incorporate this knowledge into the creation of custom pieces. This translates to built-in solutions that maximize space utilization and improve overall kitchen efficiency. Imagine a custom-built pantry with pull-out shelves and adjustable dividers, or a spice rack integrated seamlessly into a cabinet door. These are not mere additions; they are enhancements that streamline daily tasks.

Examples of Functional Woodworking in the Kitchen

  • Custom-built islands: Offering ample counter space, storage, and even integrated seating.
  • Open shelving units: Displaying beautiful cookware and adding visual interest while saving space.
  • Built-in cutting boards: Integrated directly into countertops, eliminating the need for separate, potentially bulky cutting surfaces.
  • Floating shelves: Stylish and functional, perfect for adding extra storage without cluttering the countertop.
  • Custom-designed cabinets: Tailored to specific needs and space constraints, ensuring optimal storage and accessibility.

The Craftsmanship Advantage: Quality and Longevity

Investing in custom, handcrafted woodworking furniture means investing in quality and longevity. Unlike mass-produced items, handcrafted pieces are built to last. The attention to detail, the precise joinery, and the careful selection of materials ensure a superior level of durability and resilience. A well-made wooden kitchen piece can endure for generations, adding character and value to your home over time. This commitment to quality extends beyond the material itself; it encompasses the entire design and construction process, resulting in furniture that is both beautiful and remarkably durable.

In conclusion, functional woodworking offers a unique opportunity to create a kitchen that is both stylish and incredibly efficient. By combining the natural beauty of wood with thoughtful design and skilled craftsmanship, you can craft a kitchen that is a true reflection of your personal style and a joy to use for years to come.

Top Woodworking Furniture Ideas for 2025: Get Ready to Craft!

Hey there, fellow woodworkers! So, you're looking for some inspiration for your next project? 2025 is shaping up to be a fantastic year for woodworking, with some exciting trends merging classic craftsmanship with modern aesthetics. Let's dive into some of the top furniture ideas that are going to be HUGE in the coming year. Get ready to be inspired!

The Rise of Live-Edge and Reclaimed Wood

Listen, I'm not gonna lie, live-edge and reclaimed wood have been popular for a while now, but their popularity is only growing. There's just something undeniably cool about showcasing the natural beauty of the wood. The unique character of each piece adds so much personality to a room. And let's be honest, using reclaimed wood is super sustainable, which is a huge plus for both the environment and your conscience!

Live-Edge Coffee Tables with Metal Accents

Think a chunky slab of live-edge wood supported by sleek, industrial-style metal legs. It’s a fantastic blend of rustic and modern that's incredibly versatile. You can go for a polished, refined look or keep things a bit rougher around the edges for a more farmhouse vibe. The possibilities are endless!

Reclaimed Wood Headboards with Built-in Shelves

Imagine a headboard crafted from reclaimed barn wood, complete with built-in shelves for books, bedside lamps, or even a small collection of succulents. This piece not only adds character to your bedroom but also provides functional storage â€" a win-win situation! You can even incorporate some cool lighting into the shelves for a truly unique piece.

Modern Minimalism Meets Woodworking

Minimalism isn't just about stark white walls and empty spaces anymore. It's about incorporating clean lines, simple forms, and high-quality materialsâ€"and wood is definitely a high-quality material! This trend focuses on functionality and understated elegance. Think clean, simple lines, and a focus on the natural beauty of the wood grain.

Sleek Floating Shelves

Floating shelves are a classic minimalist staple, and they're even better when made from beautiful wood. They're perfect for showcasing your favorite books, plants, or decorative items without cluttering your walls. The key here is to keep the design clean and simple â€" avoid excessive ornamentation.

Modern Dining Tables with Geometric Legs

Forget fussy details. A modern dining table with a simple rectangular or circular top supported by striking geometric legs is the epitome of understated chic. Choose a hardwood like walnut or maple for a truly luxurious feel. The simplicity of the design allows the natural beauty of the wood to take center stage.

Bringing the Outdoors In: Natural Elements in Furniture

We're seeing a growing trend towards incorporating natural elements into our home decor, and this translates beautifully to woodworking. This isn't just about using natural wood; it's about creating pieces that evoke a sense of the outdoors.

Rustic Outdoor Benches with Built-in Planters

Imagine a charming bench built from weathered wood, with built-in planters at either end, overflowing with colorful flowers or herbs. It's perfect for relaxing on your patio or deck and adds a touch of natural beauty to your outdoor space. You can even add a built-in wine rack for those lazy afternoons.

Wooden Wall Art with Incorporated Plants

This is a truly unique concept! Create a beautiful piece of wall art using reclaimed wood, incorporating small planters or even creating little hanging pockets for air plants and succulents. This blend of art and nature adds a vibrant, organic feel to any room.

Mixing and Matching Styles: Eclectic Woodworking

One of the most exciting things happening in woodworking is the willingness to experiment with different styles and aesthetics. Don't be afraid to mix and match! This creates unique, personalized pieces that reflect your individuality.

Mid-Century Modern Dressers with Industrial Hardware

Imagine a classic mid-century modern dresser, crafted from warm walnut or cherry wood, but updated with sleek, industrial-style metal hardware. It's a fantastic blend of classic and contemporary styles. This unexpected pairing creates a visually stunning and surprisingly cohesive piece.

Rustic Kitchen Islands with Modern Countertops

A rustic kitchen island made from reclaimed wood paired with a sleek, modern countertop â€" like quartz or concrete â€" is a fantastic way to combine rustic charm with modern functionality. It’s perfect for a kitchen that wants to blend the old with the new seamlessly.

Beyond the Basics: Advanced Woodworking Techniques

As technology advances, so do woodworking techniques. We're seeing more intricate designs and the incorporation of new materials alongside traditional woodworking methods.

Inlay Work with Exotic Woods

Using inlay work to create intricate designs with contrasting exotic woods is a way to elevate your furniture to the next level. The result is a piece of art that’s as functional as it is beautiful. This takes patience and skill, but the reward is a truly stunning piece.

CNC-Assisted Designs

CNC routers allow for incredibly precise and intricate designs. Combining this technology with traditional woodworking techniques opens up a world of possibilities. You can create incredibly complex shapes and patterns that would be impossible to achieve by hand alone.

Don't Forget the Finishing Touches!

No matter what style you choose, the finishing touches can make or break your piece. Take the time to carefully select your finishes and hardware to complement the overall design. A beautiful piece of furniture deserves a beautiful finish.

Commonly Asked Questions

Q: What are the most popular wood types for furniture in 2025?

A: Walnut, maple, cherry, oak, and reclaimed wood are all very popular choices. The best wood for your project will depend on your style, budget, and the specific piece you're building.

Q: What finishes are trending?

A: Natural finishes that highlight the wood grain are still very popular. However, we're also seeing an increase in the use of darker stains and even some more playful colors, particularly in accent pieces.

Q: How can I stay up-to-date on the latest woodworking trends?

A: Follow woodworking blogs, magazines, and social media accounts. Attend woodworking shows and workshops. Most importantly, experiment and find what inspires you!

Q: What tools do I need to get started?

A: This depends heavily on the project's complexity, but a good starting point would include a saw (hand saw or circular saw), a hand plane, sandpaper, clamps, and a basic set of woodworking chisels. As you progress, you can add more specialized tools to your collection.

So there you have it! A glimpse into the exciting world of woodworking in 2025. Remember, the most important thing is to have fun and let your creativity shine! Happy crafting!