Wednesday, February 5, 2025

Children's Woodworking Projects for Hands-On Learning and Fun

Hey there, parents and educators! Are you looking for fun and engaging activities that will help your kids learn valuable skills while having a blast? Look no further! Woodworking is a fantastic way to boost creativity, problem-solving abilities, and fine motor skills, all while creating something tangible and awesome. Forget screens for a while, and let's get those little hands busy with wood!

Getting Started: Safety First!

Before we dive into the fun projects, let's talk safety. Woodworking involves tools, and safety should always be our top priority. Here's what you need to keep in mind:

Setting Up a Safe Workspace

  • Designated Area: Choose a well-lit, spacious area specifically for woodworking. Keep it clear of clutter.
  • Adult Supervision: Always supervise children closely, especially when using tools. No exceptions!
  • Proper Attire: Encourage kids to wear safety glasses, closed-toe shoes, and clothing that won't get caught in machinery.
  • Tool Storage: Keep tools stored away safely when not in use. Out of reach of little hands!

Choosing the Right Tools

For younger children, start with simple, child-safe tools. We're talking things like blunt-ended craft knives, kid-friendly saws (with rounded teeth), and soft mallets. As they get older and more experienced, you can gradually introduce more advanced tools, always under careful supervision. Remember to teach them how to use each tool properly and safely before letting them loose.

Easy Woodworking Projects for Young Children (Ages 3-5)

With little ones, keep it simple and focus on fun! These projects are all about developing hand-eye coordination and creativity.

Nature Collages

Gather some smooth, flat pieces of wood (think small scraps or even sturdy twigs). Let your child decorate them with natural materials like leaves, small twigs, flowers, and seeds. They can use glue to attach everything. These nature-inspired masterpieces are perfect for decorating their rooms.

Painted Wooden Spoons

Plain wooden spoons are readily available and make fantastic canvases for little artists. Let them paint, decorate, and personalize their spoons. They can even add glitter or other embellishments! These can be used for pretend cooking or simply as decorative pieces.

Simple Wooden Puzzles

Using large, thick pieces of wood (think balsa wood or even large craft sticks), create simple shapes that can be easily assembled and disassembled. Let your child help you design and glue the pieces together. This is a great way to introduce basic shapes and spatial reasoning.

Intermediate Woodworking Projects (Ages 6-8)

As children develop their fine motor skills and coordination, we can introduce slightly more complex projects. These projects still emphasize fun but also require more precision and planning.

Birdhouses

Building a birdhouse is a classic woodworking project that's both fun and rewarding. You can find pre-cut kits specifically designed for children, or create your own from simple plans. This teaches kids about measurement, assembly, and the importance of accuracy.

Toy Cars or Trucks

With some assistance, older children can create their own simple toy cars or trucks from scrap wood. This project involves more intricate cutting and shaping, allowing kids to use more advanced tools (always under strict supervision!).

Decorative Wooden Boxes

Building a small wooden box is another excellent project. Kids can learn about joining techniques and create a unique storage solution for their treasures. They can also decorate the box with paint, decoupage, or even pyrography (wood burning – only with adult supervision and appropriate equipment!).

Advanced Woodworking Projects (Ages 9-12)

For older children, we can introduce more complex techniques and projects that require more planning and precision.

Small Furniture Pieces

With appropriate supervision and guidance, older children might be ready to tackle building small pieces of furniture, such as a simple stool or a small bookshelf. This is a chance to learn about more advanced woodworking techniques such as joinery and finishing.

Model Ships or Airplanes

Building model ships or airplanes is a fantastic way to combine woodworking with creative expression. It requires patience, precision, and attention to detail. The finished product will be a source of pride and accomplishment.

Personalized Cutting Boards

Cutting boards are practical, functional, and can be highly personalized. Older children can learn about wood selection, safety considerations when using sharp tools, and finishing techniques to create a beautiful and useful gift.

Finishing Touches and Creative Exploration

Don't forget the fun part! Once the basic structure of the project is complete, let your child's creativity shine. Encourage them to personalize their creations with paint, stain, varnish, stickers, or anything else that inspires them. Let them express their unique style and create something truly special.

Commonly Asked Questions

Q: What kind of wood is best for kids' woodworking projects?

A: Softwoods like pine or balsa wood are ideal for beginners. They are easy to work with and less likely to cause injury.

Q: Are there any woodworking kits specifically designed for kids?

A: Yes! Many companies offer kid-friendly woodworking kits with pre-cut pieces and simple instructions. These are a great way to get started.

Q: What if my child makes a mistake?

A: Mistakes are part of the learning process! Don't worry about perfection. Encourage your child to learn from their mistakes and try again. Sometimes, a "mistake" can even lead to a unique and unexpected design.

Q: How do I keep my child interested in woodworking?

A: Make it fun! Choose projects that align with your child's interests. Let them have some control over the design and decoration process. Celebrate their accomplishments, no matter how small.

Q: Where can I find more project ideas?

A: The internet is a treasure trove of woodworking project ideas for kids. You can find many free plans and tutorials on websites and YouTube.

Remember, the goal is to have fun and learn together! Happy woodworking!

DIY Rustic Furniture Plans for a Cozy Home: Let's Get Crafty!

Hey there, fellow homebodies! Are you dreaming of a cozy, rustic haven but finding that the price tag on pre-made furniture is, well, a little less than dreamy? Don't despair! You can totally achieve that charming, rustic look without breaking the bank. In fact, you can have a whole lot of fun doing it yourself! This guide is packed with ideas and inspiration to help you build your own rustic furniture, adding personality and warmth to your home one project at a time. Grab your tools, let's get started!

Choosing Your Rustic Style

Before you even think about sawing anything, it's crucial to decide what kind of rustic look you're going for. Rustic isn't a one-size-fits-all style; it encompasses a whole spectrum of aesthetics.

Rustic Farmhouse:

This style is all about clean lines, light woods (like pine or oak), and a touch of vintage charm. Think whitewashed finishes, simple designs, and maybe a bit of distressed paint for that lived-in feel. It's fresh, airy, and incredibly versatile.

Mountain Lodge Rustic:

For a more rugged look, embrace the mountain lodge style. Think rich, dark woods (like walnut or cherry), heavy beams, and chunky furniture. Leather accents and warm textures add to the cozy, outdoorsy vibe. This style is perfect for creating a warm and inviting retreat.

Coastal Rustic:

If you live near the coast, or just love that breezy, seaside feel, coastal rustic might be your perfect match. This style typically uses lighter woods, often with a weathered or whitewashed finish. It incorporates natural elements like driftwood, seashells, and rope, to bring the beauty of the ocean inside.

Easy DIY Rustic Furniture Projects

Now for the fun part! Here are a few DIY projects perfect for beginners, offering a fantastic entry point into the world of rustic furniture making.

Rustic Coffee Table from Reclaimed Wood Pallets:

This is seriously easy and budget-friendly! Find some old pallets (make sure they're treated for outdoor use!), carefully disassemble them, and sand down the wood. You can leave the wood in its natural state for a truly rustic feel or paint it a warm color. Assemble the planks into a simple square or rectangular frame, adding sturdy legs made from scrap wood or even repurposed metal pipes. A simple stain or sealant will protect your masterpiece.

DIY Headboard from Reclaimed Barn Wood:

Add instant character to your bedroom! Source reclaimed barn wood (check local salvage yards or even ask around – you might be surprised what people have lying around!). You can create a simple headboard by attaching planks of varying lengths and widths directly to the wall, or build a frame and attach the wood to that. Again, sanding is key, and a simple sealant will give it a long life.

Rustic Bench from Untreated Pine Boards:

Perfect for an entryway or mudroom! Untreated pine is readily available and relatively inexpensive. Build a simple frame using 2x4s, then attach the pine boards to the top for the seat. You can leave the wood natural or stain it for a deeper color. Consider adding some simple rustic metal legs for extra support and style.

Essential Tools & Materials

Before you dive into any project, make sure you have the right tools and materials. Investing in quality tools will make your DIY journey much smoother and safer.

  • Measuring tape and level: Absolutely essential for accurate cuts and ensuring your furniture is stable.
  • Saw (circular saw or hand saw): For cutting wood to size.
  • Drill and drill bits: For creating pilot holes and fastening pieces together.
  • Screws and nails: Choose high-quality screws and nails for strength and durability.
  • Sandpaper (various grits): For smoothing out surfaces and removing splinters.
  • Wood stain or paint (optional): To personalize the look of your furniture.
  • Wood sealant or varnish: To protect your furniture from wear and tear.
  • Safety glasses and work gloves: Safety first!

Tips for Success

Here are a few tips to help you create beautiful, long-lasting rustic furniture:

  • Plan your project: Draw out your design and make a list of materials needed before you start.
  • Sand thoroughly: Smooth surfaces are essential for a professional finish.
  • Use quality materials: Invest in good quality wood and hardware for durability.
  • Take your time: Don't rush the process; enjoy the creative journey!
  • Don't be afraid to experiment: Rustic style embraces imperfection, so don't worry about minor flaws.

Beyond the Basics: More Advanced Projects

Once you've mastered the basics, you can move on to more ambitious projects, such as building a rustic dining table, a charming bookshelf, or even a complete rustic bedroom set. Plenty of online resources and tutorials are available to guide you through more complex builds.

Commonly Asked Questions

Q: Where can I find reclaimed wood?

A: Check local salvage yards, demolition sites, or even ask friends and neighbors if they have any old wood they're willing to part with. Craigslist and Facebook Marketplace are also great resources.

Q: What kind of wood is best for rustic furniture?

A: Pine, oak, and cedar are popular choices for their affordability and workability. Reclaimed wood adds unique character.

Q: How do I seal my finished furniture?

A: Apply a wood sealant or varnish according to the manufacturer's instructions. This will protect the wood from moisture, scratches, and UV damage.

Q: What if I make a mistake?

A: Don't worry! Rustic style celebrates imperfections. A small mistake can often add to the charm. If it's a significant error, you might need to start over on that specific part, but don't let it discourage you.

So, there you have it! With a little creativity and effort, you can transform your home into a cozy, rustic haven filled with furniture you built yourself. Happy crafting!

Free Woodworking Projects for Crafting Beautiful Designs

The allure of woodworking lies in its capacity to transform raw materials into objects of both functional utility and aesthetic beauty. The inherent warmth and natural grain of wood lend themselves to countless design possibilities, making it a rewarding and versatile craft. This article explores a selection of free woodworking projects, suitable for various skill levels, that allow for the creation of stunning and personalized designs. From simple yet elegant pieces to more intricate undertakings, these projects offer opportunities to hone woodworking skills while crafting beautiful additions to any home or workspace.

Beginner-Friendly Projects: Mastering the Fundamentals

For those new to woodworking, starting with straightforward projects is crucial for building confidence and developing fundamental skills. These projects emphasize simple joinery techniques and readily available materials, minimizing complexity while maximizing aesthetic impact.

Simple Serving Tray

A serving tray is a fantastic introductory project. Its construction involves basic cuts, sanding, and finishing. Choose a visually appealing hardwood like cherry or maple for a polished look. The design can be easily customized with inlay work or decorative edge treatments. Simple miter joints or butt joints are sufficient for assembly, making it ideal for learning fundamental joinery.

Materials: Hardwood planks, wood glue, wood finish (stain, varnish, or polyurethane), sanding paper.

Tools: Miter saw (or hand saw), clamps, sandpaper, measuring tape, safety glasses.

Coasters

Coasters are an excellent way to practice precision cutting and finishing techniques. Using scrap wood allows for experimentation with different wood species and stains. Simple geometric shapes or intricate designs can be cut using a jigsaw or laser cutter (if available). Consider adding a felt or cork backing for protection of furniture surfaces.

Materials: Scrap hardwood, felt or cork, wood glue.

Tools: Jigsaw (or laser cutter), sandpaper, wood glue, scissors.

Wooden Box

A simple wooden box, utilizing rabbet or dado joints, is an ideal project for learning about joinery. The box can be any size, and the design can be customized with decorative hinges, latches, or a personalized engraved design. This project provides hands-on experience with measuring, cutting, and assembling components accurately.

Materials: Softwood or hardwood planks, wood glue, hinges or latches (optional), wood finish.

Tools: Table saw (or hand saw), chisels (optional), clamps, sandpaper, wood finish.

Intermediate Projects: Refining Techniques and Exploring Design

Once foundational skills are established, intermediate projects offer opportunities to explore more complex joinery techniques, refined design elements, and the incorporation of decorative details.

Wall-Mounted Shelf

A wall-mounted shelf presents a chance to practice precise measurements and secure fastening techniques. Consider incorporating unique bracket designs or decorative molding for an enhanced aesthetic. Different types of wood can be combined to create contrasting visual effects. The shelf can be designed to suit specific spaces and storage needs.

Materials: Hardwood planks, wood screws, wall anchors (appropriate for your wall type), wood finish.

Tools: Drill, screwdriver, measuring tape, level, sandpaper, wood finish.

Small Coffee Table

Building a small coffee table involves more intricate planning and assembly. This project allows for exploration of different leg designs, tabletop shapes, and joinery methods such as mortise and tenon or dowel joints. Consider adding a shelf for additional storage or using contrasting wood species to create visual interest.

Materials: Hardwood planks, wood glue, wood screws, wood finish, leg brackets or turned legs.

Tools: Table saw, drill, clamps, router (optional), sandpaper, wood finish.

Birdhouse

A birdhouse, while seemingly simple, presents opportunities for creative design and precision woodworking. Beyond the basic structure, intricate details such as decorative shingles, perches, or entry holes can be added. The project reinforces accurate cutting and assembly techniques while fostering a connection with nature.

Materials: Softwood or hardwood, wood glue, nails or screws, wood finish (optional).

Tools: Saw, drill, hammer or screwdriver, sandpaper.

Advanced Projects: Mastering Complex Joinery and Design

Advanced projects require a higher level of skill and precision, focusing on complex joinery, intricate designs, and advanced finishing techniques.

Small Desk

Constructing a small desk necessitates meticulous planning and execution. This project provides the opportunity to master advanced joinery techniques such as dovetail joints or complex frame-and-panel construction. The design can be customized with drawers, shelves, or integrated cable management.

Materials: Hardwood, wood glue, wood screws, hinges, drawer slides, wood finish.

Tools: Table saw, router, hand planes, chisels, clamps, sandpaper, wood finish.

Outdoor Bench

An outdoor bench demands durable materials and weather-resistant finishes. This project challenges the woodworker to create a sturdy and aesthetically pleasing piece that can withstand the elements. Different joinery techniques can be employed to ensure strength and stability. The design can be tailored to specific outdoor spaces and personal preferences.

Materials: Pressure-treated lumber or durable hardwood, exterior-grade wood glue, wood screws, exterior-grade wood finish.

Tools: Table saw, miter saw, drill, clamps, sandpaper, wood finish, appropriate fasteners for outdoor use.

Armoire or Wardrobe

Building an armoire or wardrobe is a significant undertaking requiring advanced planning and execution. This project showcases mastery of complex joinery, intricate design, and advanced finishing techniques. The armoire or wardrobe can be customized with various features, such as drawers, shelves, and hanging rods, tailored to specific storage needs.

Materials: High-quality hardwood, wood glue, wood screws, hinges, drawer slides, wood finish, appropriate hardware.

Tools: Table saw, router, jointer, planer, hand planes, chisels, clamps, sandpaper, wood finish.

Regardless of skill level, undertaking these woodworking projects fosters creativity, problem-solving abilities, and a profound appreciation for the beauty and functionality of handcrafted items. Remember to always prioritize safety by utilizing appropriate personal protective equipment and following safe woodworking practices.

Sunday, February 2, 2025

Constructing a Durable Wooden Toy Chest: A Comprehensive DIY Guide

This document provides a detailed, step-by-step guide for constructing a sturdy and aesthetically pleasing wooden toy chest. The project is designed for individuals with intermediate woodworking skills, though modifications can be made to accommodate beginners. Careful attention to detail and adherence to the specified dimensions will ensure a high-quality finished product.

I. Planning and Material Acquisition

A. Design Considerations

Before commencing the construction, carefully consider the desired dimensions of the toy chest. Factors to account for include the available space, the anticipated volume of toys to be stored, and the overall aesthetic integration with the surrounding environment. Standard dimensions for a child's toy chest might range from 30 inches wide by 18 inches deep by 18 inches high, but these can be adjusted according to your needs. Sketching a design beforehand is highly recommended, allowing for visualization and potential modifications.

B. Material Selection

The choice of wood significantly impacts the durability and longevity of the toy chest. Hardwoods such as oak, maple, or cherry offer superior strength and resistance to wear and tear, resulting in a longer-lasting product. However, they also come at a higher cost. Softwoods such as pine or fir are more economical but may require additional care and maintenance to withstand the rigors of daily use. Consider the intended environment – a high-traffic area might necessitate a hardwood choice. Always select wood that is free from significant knots or imperfections to ensure structural integrity.

In addition to the wood, you will require the following materials:

  • Wood glue (high-quality, exterior-grade is recommended)
  • Wood screws (various lengths depending on the wood thickness)
  • Wood filler
  • Sandpaper (various grits, from coarse to fine)
  • Wood stain or paint (optional, for finishing)
  • Clear sealant (optional, for protection)
  • Hinges (heavy-duty, to support the weight of the lid)
  • Lid stay (to prevent the lid from slamming shut)
  • Measuring tape
  • Pencil
  • Safety glasses
  • Work gloves
  • Clamps (various sizes)
  • Saw (circular saw or hand saw)
  • Drill with drill bits
  • Screwdriver (or drill with appropriate bit)
  • Putty knife
  • Brushes (for stain or paint)

II. Construction Process

A. Cutting the Wood

Based on your chosen dimensions, cut the wood to the following specifications:

  • Sides (2 pieces): Height x Width
  • Front and Back (2 pieces): Height x Depth
  • Bottom (1 piece): Width x Depth
  • Lid (1 piece): Width + 2 inches x Depth + 2 inches (to allow for overhang)

Ensure accuracy in measuring and cutting, as inconsistencies will compromise the final assembly. Use a miter saw or circular saw for precise cuts. Always wear safety glasses during cutting operations.

B. Assembling the Chest

Apply wood glue to the edges of the bottom piece, and then carefully position it within the frame formed by the sides, front, and back pieces. Secure the joints using wood screws. Predrill holes to prevent wood splitting. Ensure the corners are square and properly aligned before tightening the screws. Use clamps to hold the pieces firmly in place while the glue dries.

C. Constructing the Lid

If using a single piece for the lid, ensure the added 2 inches on each side are evenly distributed. If using multiple pieces, carefully join them with glue and screws, ensuring a smooth and level surface. Sand any imperfections smooth before attaching it to the chest.

D. Attaching the Lid

Attach the hinges to the inside of the lid and the top edge of the chest. Position the hinges evenly spaced for optimal support. The type and number of hinges will depend on the size and weight of the lid. Heavy-duty hinges are recommended to prevent sagging over time. Attach the lid stay to prevent the lid from slamming shut and potentially causing injury.

III. Finishing Touches

A. Sanding and Smoothing

Once the glue is fully dried, thoroughly sand all surfaces of the toy chest, starting with coarser grit sandpaper and progressively moving to finer grits. This removes any imperfections, ensuring a smooth surface for staining or painting. Pay particular attention to the edges and corners.

B. Applying Stain or Paint

Apply a wood stain or paint according to the manufacturer's instructions. Multiple coats may be necessary for optimal coverage and color saturation. Allow adequate drying time between coats. For a more durable finish, apply a clear sealant after the stain or paint has completely dried.

C. Final Inspection

Before considering the project complete, conduct a final inspection. Ensure all screws are securely tightened, the hinges operate smoothly, and the lid stays open securely without wobbling. Address any remaining imperfections before declaring the project finished. A properly constructed toy chest will provide years of reliable service and storage.

IV. Safety Precautions

Throughout the construction process, prioritize safety. Always wear safety glasses to protect your eyes from flying debris. Use appropriate work gloves to protect your hands. Ensure proper ventilation when using stains, paints, or sealants. Keep children and pets away from the work area. Dispose of all waste materials responsibly according to local regulations. Remember that power tools can be dangerous; always operate them according to manufacturer's instructions.

With careful planning, meticulous execution, and a commitment to safety, constructing a durable and attractive wooden toy chest can be a rewarding DIY project.

Saturday, February 1, 2025

Comfortable Chair Woodworking Plans for Your Home

The creation of a comfortable and aesthetically pleasing chair is a rewarding endeavor for any woodworking enthusiast. This detailed guide provides comprehensive plans for constructing a comfortable chair suitable for various home environments, encompassing design considerations, material selection, step-by-step construction, and finishing techniques. The project is designed to be achievable for woodworkers with intermediate skills, offering flexibility for customization and personal expression.

I. Design Considerations: Tailoring the Chair to Your Needs

Before commencing the construction process, careful consideration of the chair's design is paramount. This stage involves defining the chair's intended use, desired aesthetics, and ergonomic features. The following factors should be carefully evaluated:

A. Intended Use and Style:

Will the chair primarily serve as a reading chair, a dining chair, or an accent piece? The intended use will significantly influence the chair's overall design. A reading chair, for instance, will benefit from a higher back and ample armrests, providing optimal support for extended periods of sitting. Conversely, a dining chair requires a more compact design to facilitate comfortable dining experiences. Consider the existing style of your home decor to ensure aesthetic harmony. Traditional, modern, rustic, or minimalist styles all offer unique design possibilities.

B. Dimensions and Ergonomics:

Accurate dimensions are crucial for ensuring both comfort and structural integrity. The seat height, depth, width, back height, and armrest height should be carefully considered based on the average user's dimensions. Ergonomics play a critical role in achieving a comfortable sitting experience. Proper lumbar support, appropriate seat angle, and comfortable armrest placement contribute significantly to overall comfort and minimize potential strain. Detailed measurements and sketches should be prepared prior to material acquisition.

C. Material Selection:

The choice of wood significantly impacts the chair's durability, aesthetic appeal, and workability. Hardwoods such as oak, maple, cherry, and walnut offer excellent strength and longevity, while softer woods like pine and poplar are more readily available and easier to work with, albeit less durable. Consider the wood's grain pattern, color, and overall aesthetic compatibility with the intended design and home décor. The moisture content of the wood must also be considered to prevent warping or cracking during and after construction.

II. Materials and Tools: Assembling Your Arsenal

Having finalized the design, the next step involves gathering the necessary materials and tools. A well-equipped workspace is essential for efficient and safe construction.

A. Lumber Requirements:

The quantity of lumber required will vary depending on the chair's dimensions and design. A detailed cutting list should be generated based on the finalized design drawings. This list should specify the dimensions and type of wood for each component, including the legs, seat supports, back supports, armrests, and any decorative elements. Always purchase slightly more lumber than estimated to account for potential errors and waste.

  • Legs (4): Specify dimensions and wood type.
  • Seat supports (2 or more): Specify dimensions and wood type.
  • Back supports (2 or more): Specify dimensions and wood type.
  • Armrests (2): Specify dimensions and wood type.
  • Seat slats/panel: Specify dimensions and wood type.

B. Essential Tools:

A comprehensive set of woodworking tools is essential for precise and efficient construction. This includes, but is not limited to:

  • Measuring tools: Measuring tape, square, combination square
  • Cutting tools: Hand saw, circular saw, jigsaw (for curved cuts)
  • Joining tools: Wood glue, clamps (various sizes), screws, dowels, biscuits, mortise and tenon joinery tools (depending on the design)
  • Finishing tools: Sander (various grits), brushes, rags
  • Safety equipment: Safety glasses, hearing protection, dust mask

III. Construction Process: A Step-by-Step Guide

The construction process is divided into distinct stages, each demanding precision and attention to detail. Adherence to proper techniques and safety precautions is crucial throughout the entire process.

A. Cutting and Shaping:

Begin by accurately cutting the lumber according to the cutting list. Utilize appropriate cutting tools and techniques to ensure clean, precise cuts. Sand all cut surfaces to remove any splinters or roughness. Shape curved components using jigsaws or hand tools as required by the design.

B. Joint Preparation and Assembly:

Prepare joints according to the chosen joinery method. This might involve creating mortise and tenon joints, dowel joints, biscuit joints, or using screws for simpler designs. Ensure accurate alignment and secure clamping during assembly. Apply wood glue liberally to all joints for superior strength and durability.

C. Seat and Back Construction:

Assemble the seat frame, attaching the seat supports securely. Install seat slats or a seat panel, ensuring a comfortable and sturdy seat. Construct the chair back, attaching it to the seat frame and ensuring adequate support and ergonomic design. Carefully check for proper alignment and stability throughout the assembly process.

D. Armrest and Leg Attachment:

Attach the armrests to the seat frame and back supports, ensuring comfortable height and secure attachment. Attach the legs to the seat frame using strong and stable joinery. Reinforce the joint connections as necessary to ensure the chair's structural integrity and longevity.

IV. Finishing Touches: Enhancing Aesthetics and Durability

Once the chair is assembled, the final step involves applying a finish to enhance its aesthetic appeal and protect the wood from wear and tear.

A. Sanding:

Thoroughly sand all surfaces using progressively finer grits of sandpaper. This process smooths the surfaces and prepares them for the finish. Pay particular attention to corners and edges to achieve a smooth, uniform finish.

B. Finishing Application:

Apply a suitable finish, such as varnish, polyurethane, or stain, according to the manufacturer's instructions. Multiple thin coats are generally recommended over a single thick coat to ensure even coverage and prevent drips or runs. Allow adequate drying time between coats. Consider using a sealant prior to applying the final finish for added protection against moisture.

C. Inspection and Refinement:

After the final coat has dried, carefully inspect the chair for any imperfections. Address any minor flaws with touch-up coats or sanding, ensuring a high-quality and professional finish. A final inspection ensures the chair's structural integrity and confirms its aesthetic appeal before placement within the home environment.

By following these detailed plans, woodworking enthusiasts can create a comfortable and visually appealing chair that adds both function and elegance to their home. Remember that customization is key; adapt these plans to your individual needs and preferences to create a truly unique and personalized piece.

Saturday, January 25, 2025

Building a Cajon with Superior Acoustic Design

The cajon, a simple yet versatile percussion instrument, offers a surprisingly complex world of acoustic engineering. Building your own allows for precise control over its sound, transforming it from a mere box into a finely tuned instrument. This guide provides a detailed approach to constructing a cajon with superior acoustic properties, focusing on the design elements that significantly influence its tone and resonance.

Choosing Your Wood: The Foundation of Sound

The wood you select forms the backbone of your cajon's sound. Hardwoods are generally preferred for their durability and resonant qualities. Consider these options: birch, maple, oak, and mahogany each impart a unique sonic character. Birch, for example, delivers a bright and snappy sound, while mahogany lends a warmer, more mellow tone. The thickness of the wood also affects the sound; thicker walls generally produce a deeper, fuller bass response. Experiment with different thicknesses to achieve your desired sound profile.

Understanding Wood Density and its Impact

Wood density plays a crucial role in the cajon's resonance. Denser woods tend to vibrate less freely, resulting in a tighter, more focused sound. Conversely, less dense woods produce a more resonant, booming sound. Understanding this relationship is key to tailoring the cajon's sound to your personal preference. For instance, a cajon made with dense maple will offer a crisp, articulate sound, perfect for precise rhythms, while a cajon crafted from less dense mahogany will provide a rich, full-bodied tone ideal for a more melodic approach.

Constructing the Sound Chamber: Optimizing Internal Resonance

The interior of the cajon is just as crucial as the exterior wood. The size and shape of the sound chamber significantly impact the overall tone. A larger chamber generally produces a deeper bass response, while a smaller chamber will yield a more focused, snappy sound. You can experiment with internal bracing to further modify the resonance. Avoid excessive bracing, as this can dampen the vibrations and reduce the volume. The goal is to find a balance between structural integrity and optimal resonance.

Internal Bracing and Sound Modification

Strategic internal bracing can subtly shape your cajon's sound. Experiment with the placement and number of braces. Adding braces near the sound hole can enhance the bass response, while braces near the top can influence the slap tone. You should consider using lighter wood for bracing to avoid overly dampening the vibrations. Remember to leave ample space for air movement within the sound chamber for optimal resonance.

Crafting the Snare System: Achieving the Desired Snappy Response

The snare system, responsible for the distinctive "snappy" sound when striking the playing surface, requires careful attention to detail. The most common method is using a set of snare wires strung across the internal back panel. The tension of these wires directly affects the snappy effect. Experiment with different tensions to find the optimal balance between a crisp, articulate snare sound and a comfortable playing experience.

Choosing Snare Wire Gauge and Tension

The gauge (thickness) of the snare wires also contributes to the overall sound. Thicker wires provide a louder, more pronounced snare effect, whereas thinner wires create a subtler, more delicate sound. Adjusting the tension allows for fine-tuning the snare's response, balancing loudness and clarity. Remember to leave some space between the wires for optimal resonance.

By carefully considering these design aspects â€" wood selection, sound chamber dimensions, and snare system configuration â€" you can create a cajon that truly reflects your artistic vision and delivers the precise sonic characteristics you desire. Enjoy the rewarding process of building your custom cajon!

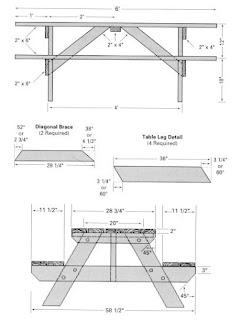
Detailed Woodworking Plan for a Family-Sized Four-Seater Picnic Table

I. Introduction

This document provides a comprehensive woodworking plan for constructing a durable and aesthetically pleasing four-seater picnic table suitable for family use. The design emphasizes straightforward joinery techniques achievable by intermediate-level woodworkers, prioritizing strength and longevity. Detailed dimensions and material lists are provided, alongside step-by-step instructions and illustrations (not included in this text-based plan, but readily imagined or drawn separately). The chosen material is pressure-treated lumber, ensuring weather resistance and minimizing maintenance. This plan prioritizes safety and stability, incorporating robust construction methods to withstand regular use and the elements.

II. Materials List

The following materials are required for this project. Adjust quantities as necessary based on lumber dimensions and potential waste.

A. Lumber:

  • Four 4x4 pressure-treated posts: 30 inches long (legs).
  • Two 2x6 pressure-treated boards: 72 inches long (top supports - lengthwise).
  • Four 2x6 pressure-treated boards: 60 inches long (seat supports - across the length).
  • Two 2x12 pressure-treated boards: 72 inches long (table top).
  • Four 2x12 pressure-treated boards: 60 inches long (table seats).
  • Various scraps of 2x4 pressure-treated lumber: for bracing and reinforcement (quantities to be determined during construction).

B. Hardware:

  • 36 Exterior-grade wood screws: 3 1/2 inches long.
  • 24 Exterior-grade wood screws: 2 1/2 inches long.
  • 8 Exterior-grade carriage bolts: 5/16 inch diameter x 4 inches long (for leg-to-support connection).
  • 8 Washers: to fit carriage bolts.
  • 8 Nuts: to fit carriage bolts.
  • Wood glue (exterior grade): For added strength and water resistance in joints.

C. Tools:

  • Measuring tape and pencil
  • Circular saw or miter saw
  • Drill with various drill bits (including a 5/16 inch drill bit for carriage bolts).
  • Screwdriver (impact driver recommended)
  • Wrench (to tighten carriage bolts)
  • Safety glasses
  • Work gloves
  • Clamps (various sizes)
  • Level
  • Sandpaper (various grits)
  • Wood sealer/stain (optional)

III. Construction Steps

The following steps outline the construction process. Accuracy and precision are crucial at each stage to ensure the final product's structural integrity and aesthetic appeal.

A. Preparing the Legs and Supports:

  1. Cut the four 4x4 posts to 30 inches in length. Ensure all cuts are square and accurate using a miter saw or circular saw and a speed square.
  2. Cut the two 2x6 top supports to 72 inches. These will run the length of the table, forming the frame connecting the legs.
  3. Cut the four 2x6 seat supports to 60 inches. These will span the width of the table, connecting the legs and forming the base for the seats.
  4. Lightly sand all cut edges to remove any splinters or rough surfaces.

B. Assembling the Table Base:

  1. Pre-drill pilot holes at each leg's end to prevent wood splitting when driving in screws. This is especially important with pressure-treated lumber.
  2. Attach the top support beams to the legs using the 3 1/2-inch exterior-grade wood screws. Ensure that the supports are flush against the legs and parallel to each other.
  3. Attach the seat support beams to the legs using the 3 1/2-inch exterior-grade wood screws. Ensure that the seat supports are equally spaced and perpendicular to the top supports.
  4. Reinforce the leg-to-support connections using the carriage bolts. Pre-drill holes for the bolts to prevent splitting. Insert the bolts through the legs and supports, add the washer and nut, and tighten securely.
  5. Check the levelness of the table base; adjust as needed using shims if any legs are uneven.

C. Attaching the Tabletop and Seats:

  1. Cut the two 2x12 boards for the tabletop to 72 inches. Sand all edges thoroughly.
  2. Cut the four 2x12 boards for the seats to 60 inches. Sand all edges thoroughly.
  3. Apply a generous amount of exterior-grade wood glue to the top supports and position the tabletop boards onto the supports.
  4. Secure the tabletop boards to the supports using the 2 1/2-inch exterior-grade wood screws. Space the screws evenly along the length of each board.
  5. Apply a generous amount of exterior-grade wood glue to the seat supports and position the seat boards onto the supports.
  6. Secure the seat boards to the supports using the 2 1/2-inch exterior-grade wood screws, evenly spacing them.

D. Finishing Touches:

  1. Carefully sand all surfaces of the completed picnic table to smooth out any rough edges or imperfections. Start with a coarser grit sandpaper and gradually move to a finer grit for a smoother finish.
  2. Apply a wood sealer or stain (optional) to protect the wood from the elements and enhance its appearance. Follow the manufacturer's instructions for application and drying time. Allow ample drying time before use.
  3. Inspect the entire structure for any loose screws, wobbly legs, or other issues. Tighten any loose screws or make necessary adjustments as needed.

IV. Safety Precautions

Safety is paramount throughout this project. Always wear safety glasses and work gloves. Use caution when operating power tools, following all manufacturer's instructions. Ensure proper ventilation when working with wood stains or sealers. Dispose of sawdust and waste materials responsibly.

V. Conclusion

This detailed plan provides a comprehensive guide for building a sturdy and attractive four-seater picnic table. By following these instructions carefully and utilizing the recommended materials and tools, you can create a lasting piece of outdoor furniture for your family to enjoy for years to come. Remember that accuracy and attention to detail are crucial for a successful outcome. Always prioritize safety and take necessary precautions throughout the construction process.

Wednesday, January 22, 2025

Constructing a Rustic Country Bookshelf: A Comprehensive Guide Utilizing Free Woodworking Plans

This article provides a detailed guide for constructing a rustic country bookshelf, incorporating readily available free woodworking plans. The project emphasizes a straightforward approach, suitable for both novice and experienced woodworkers. The design prioritizes a visually appealing, robust structure that complements various interior styles, emphasizing the inherent beauty of natural wood.

I. Gathering Materials and Tools

Before embarking on the construction, meticulous preparation is paramount. This includes acquiring the necessary materials and tools, ensuring the project progresses smoothly and efficiently. The following sections detail the specific requirements for this rustic country bookshelf.

A. Lumber Selection and Acquisition

The choice of lumber significantly influences the final aesthetic and structural integrity of the bookshelf. For this project, we recommend using reclaimed wood or pine, both readily available and lending themselves well to a rustic finish. Reclaimed wood offers unique character and visual interest, while pine provides a more consistent texture and is generally more affordable. Aim for lumber with minimal knots and warping for ease of construction. The quantity required will depend on the desired dimensions of the bookshelf, referring to the chosen free woodworking plans for precise measurements. Generally, you'll need boards for the shelves, sides, and supports, ensuring sufficient thickness for stability.

B. Essential Hardware and Fasteners

The following hardware is essential for the successful completion of the project:

  • Wood screws: Choose appropriately sized wood screws to securely fasten the various components. Consider using exterior-grade screws for added durability and resistance to moisture.
  • Wood glue: High-quality wood glue enhances the structural integrity of the joints, providing additional strength and preventing movement.
  • Sandpaper: A variety of grits (e.g., 80, 120, 220) are needed for smoothing the surfaces and achieving a fine finish.
  • Wood filler: This will be used to fill any imperfections or gaps in the wood, ensuring a smooth surface for painting or staining.
  • Optional: Depending on your chosen finish, you may require paint, stain, varnish, or other protective coatings.

C. Essential Tools

The following tools are necessary for constructing the bookshelf:

  • Measuring tape and pencil: Accurate measurements are crucial for precise cuts and assembly.
  • Circular saw or hand saw: Used for cutting the lumber to the dimensions specified in the free woodworking plans.
  • Drill with drill bits: Necessary for pre-drilling pilot holes before screwing components together, preventing wood splitting.
  • Screwdriver: For tightening the wood screws.
  • Clamps: To secure the components during assembly and gluing.
  • Safety glasses and hearing protection: Crucial for maintaining a safe working environment.
  • Sanding block or electric sander: For achieving a smooth surface finish.
  • Putty knife: For applying wood filler.
  • Brushes or rags: For applying finishes (if applicable).

II. Utilizing Free Woodworking Plans and Construction Phases

Numerous free woodworking plans are readily available online. Search for "rustic country bookshelf plans" to find a design that aligns with your skill level and desired dimensions. Carefully review the plans before commencing construction. The following phases provide a general outline of the construction process. Specific steps will vary based on the selected plans.

A. Cutting the Lumber

Accurately cut the lumber according to the dimensions specified in your chosen free woodworking plans. Ensure clean, square cuts for proper assembly and a professional finish. Utilize a miter saw or circular saw for precise cuts and a straight edge to guide the saw for optimal accuracy.

B. Assembling the Frame

Following the instructions in your plans, assemble the main frame of the bookshelf. This typically involves joining the vertical side pieces to the horizontal supports. Apply wood glue to the joints before securing them with wood screws. Pre-drill pilot holes to prevent the wood from splitting. Use clamps to hold the components firmly in place while the glue dries.

C. Installing the Shelves

Once the frame is securely assembled and the glue is dry, install the shelves. The shelves can be supported by shelf supports or integrated into the frame's construction. Again, apply wood glue and use screws to fasten the shelves securely in place. Ensure the shelves are level and evenly spaced.

D. Sanding and Finishing

After the assembly is complete, sand all surfaces thoroughly to remove any rough edges or imperfections. Start with a coarser grit sandpaper and gradually progress to finer grits for a smooth finish. Clean the surfaces with a tack cloth to remove dust before applying any finish. Apply your chosen finish â€" paint, stain, or varnish â€" according to the manufacturer's instructions. Multiple coats may be necessary for adequate protection and a rich color.

III. Safety Precautions and Best Practices

Safety should always be prioritized during woodworking projects. Observe the following precautions:

  • Always wear safety glasses to protect your eyes from flying debris.
  • Use hearing protection when operating power tools.
  • Keep your work area clean and organized to prevent accidents.
  • Use clamps to secure workpieces during cutting and assembly.
  • Follow the manufacturer's instructions for all power tools.
  • Ensure proper ventilation when working with paints, stains, and other finishes.

By following these guidelines and utilizing carefully selected free woodworking plans, you can confidently construct a sturdy and aesthetically pleasing rustic country bookshelf that will serve as a functional and decorative addition to any room.

Remember to always consult the specific plans you choose, as the steps and measurements may vary slightly. Enjoy the process and the satisfaction of creating a beautiful piece of furniture with your own hands.

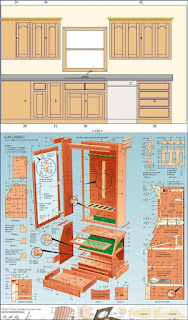
Unlocking Your Vision: Customizable Cabinet Designs for Unique Woodworking Projects

The scent of freshly cut wood, the satisfying rasp of the plane, the pride in crafting something truly unique â€" these are the joys of woodworking. But what if your next project demands more than a standard design? What if you need cabinets that perfectly integrate with a quirky space, showcase your specific needs, or reflect your personal style? This is where customizable cabinet designs become invaluable. Forget mass-produced, cookie-cutter units; embrace the power of personalized woodworking to create cabinets that are as individual as you are.

Beyond the Box: Exploring the Possibilities of Custom Cabinetry

Custom cabinet design opens a world of possibilities. Imagine cabinets perfectly fitted to that awkward alcove in your kitchen, maximizing every inch of space. Picture sleek, modern units seamlessly integrating with your minimalist décor, or rustic, farmhouse-style cabinets adding warmth and character to a cozy cottage. The constraints of standard sizes vanish, replaced by the freedom to create exactly what you envision. This isn't just about functionality; it's about elevating your space with bespoke craftsmanship.

Functionality Tailored to Your Needs

Think beyond simple shelving. Custom cabinets allow you to integrate specialized features that enhance your workflow and storage. Need a pull-out spice rack in your kitchen? A built-in ironing board in your laundry room? Drawers designed specifically for your tools in your workshop? With custom designs, you dictate the functionality, ensuring every detail serves a purpose. We can incorporate clever solutions like hidden compartments, adjustable shelves, soft-close hinges, and specialized hardware to create truly functional and user-friendly storage.

The Design Process: From Inspiration to Installation

Collaborating with a skilled woodworker on your custom cabinet project is a rewarding journey. The process typically begins with a detailed consultation where we explore your vision, needs, and budget. We'll discuss your desired style, materials, finishes, and any specific features you want to incorporate. Detailed measurements are crucial for a perfect fit, ensuring your cabinets integrate seamlessly into their surroundings. Expect thorough sketches and 3D renderings to visualize the final product before any wood is cut.

Choosing the Right Materials and Finishes

The selection of wood species significantly impacts the aesthetic and durability of your cabinets. From the classic warmth of oak and cherry to the modern elegance of walnut and maple, the possibilities are endless. We offer a wide range of wood species, each with unique grain patterns, colors, and properties. Consider factors like durability, resistance to moisture, and the overall aesthetic you desire. Once the wood is chosen, you’ll select a finish that protects the wood and enhances its beauty, from natural stains to vibrant paints.

Crafting Your Unique Style

Your personalized style should shine through in every detail. Consider the hardware: Sleek, modern handles, antique-style knobs, or custom-made pulls can dramatically impact the overall look. Think about incorporating unique features like inlays, carvings, or decorative moldings to add a personal touch. Don't be afraid to experiment and express your individuality; this is your chance to create truly unique cabinets that reflect your personal aesthetic.

Beyond the Kitchen: Expanding the Possibilities

While kitchen cabinets are a popular choice, the versatility of custom designs extends far beyond the culinary space. Imagine a custom media center perfectly housing your entertainment system, or bespoke bathroom vanities that optimize storage and add a touch of luxury. Custom built-ins for your home office can dramatically improve organization and efficiency. The only limit is your imagination!

Ready to transform your space with uniquely crafted cabinets? Contact us today to begin your custom design journey!

Constructing a Safe and Durable Baby Cradle: A Comprehensive Guide

Creating a handcrafted cradle for your newborn is a deeply rewarding project, allowing you to combine personal touch with functionality. This guide provides detailed instructions for constructing a safe and durable cradle suitable for a cherished infant. Remember that safety is paramount; always prioritize adherence to safety guidelines and utilize high-quality materials. This project requires intermediate woodworking skills and the use of appropriate safety equipment.

I. Material Selection and Preparation

Choosing the right materials is crucial for ensuring the cradle's safety, durability, and aesthetic appeal. Avoid using treated lumber as it may contain chemicals harmful to infants.

A. Lumber Selection

Opt for high-quality, untreated hardwood such as maple, cherry, or birch. These woods are strong, durable, and resistant to wear and tear. Select boards that are free from knots, cracks, and other imperfections. The following lumber dimensions are recommended, but can be adjusted based on your desired cradle size:

  • Sides (2 pieces): 1x6 x 36 inches (adjust length as needed)
  • Ends (2 pieces): 1x8 x 24 inches (adjust length as needed)
  • Bottom slats (multiple pieces): 1x2 x 22 inches (adjust length as needed)
  • Legs (4 pieces): 2x4 x 20 inches (adjust length as needed)
  • Support slats (2 pieces): 1x4 x 22 inches (adjust length as needed)

Ensure all lumber is properly dried to prevent warping or cracking. A moisture meter can be used to verify the wood's moisture content, ideally below 8%.

B. Hardware Selection

Select high-quality hardware specifically designed for children's furniture. Avoid using sharp or protruding hardware that could pose a safety risk.

  • Wood screws: Choose #8 or #10 wood screws, appropriate length for the wood thickness.
  • Wood glue: A high-quality wood glue is essential for strong joints.
  • Finishing materials: Select a non-toxic, child-safe finish such as water-based polyurethane or a natural oil finish. Always follow the manufacturer's instructions and allow sufficient drying time before use.
  • Optional: A mattress for the cradle, ensuring it fits snugly and meets all safety standards.

II. Construction Steps

Follow these steps meticulously to ensure a sturdy and safe cradle. Each step should be performed with precision and care.

A. Assembling the Cradle Frame

Begin by assembling the main frame of the cradle. This involves joining the side and end pieces.

  1. Cut the lumber: Precisely cut all lumber pieces to the specified dimensions using a miter saw or hand saw. Ensure accurate measurements to maintain the cradle's structural integrity.
  2. Assemble the sides and ends: Apply wood glue to the joints where the sides and ends meet. Secure the joints using wood screws, countersinking them slightly to prevent them from protruding.
  3. Reinforce the corners: Consider adding corner blocks or braces to reinforce the corners for added strength and stability. This is especially important for the joints connecting the sides and ends.
  4. Clamp and dry: Securely clamp the assembled frame and allow the glue to dry completely according to the manufacturer’s instructions.

B. Installing the Bottom Slats

The bottom slats provide support for the mattress and ensure proper air circulation.

  1. Spacing the slats: Evenly space the bottom slats across the inside width of the cradle frame. Maintain a consistent gap between each slat to ensure proper ventilation. A gap of approximately 1/2 inch is recommended.
  2. Securing the slats: Attach the slats to the inside of the cradle frame using wood screws. Ensure the screws are countersunk and the slats are securely fastened.
  3. Test the fit: After installing the slats, check the stability and ensure the bottom is firmly attached and level.

C. Attaching the Legs and Support Slats

The legs provide stability and elevate the cradle from the floor.

  1. Attaching the legs: Attach the legs to the corners of the cradle frame using wood glue and wood screws. Ensure the legs are evenly spaced and securely fastened for stability.
  2. Adding support slats (optional): For added strength and stability, consider adding support slats between the legs, placed midway along the length of the cradle. Attach these using wood glue and wood screws.

D. Finishing and Safety Checks

The final steps involve finishing the cradle and performing thorough safety checks.

  1. Sanding: Sand all surfaces of the cradle smooth using progressively finer grit sandpaper. Remove any splinters or sharp edges that could pose a safety hazard.
  2. Applying the finish: Apply the chosen child-safe finish according to the manufacturer's instructions. Allow ample drying time between coats. Multiple coats are recommended for durability and protection.
  3. Safety inspection: Conduct a thorough safety inspection, checking for any sharp edges, loose screws, or other potential hazards. Ensure all joints are secure and the cradle is stable.

III. Safety Precautions

Always prioritize safety when constructing and using a baby cradle.

  • Use appropriate safety equipment: Wear safety glasses and a dust mask when sanding and using power tools.
  • Regular inspections: Regularly inspect the cradle for any signs of damage or wear and tear.
  • Proper mattress fit: Ensure the mattress fits snugly within the cradle to prevent the baby from getting trapped.
  • Never leave the baby unattended: Never leave a baby unattended in the cradle.
  • Adhere to safety standards: Familiarize yourself with relevant safety standards and regulations for baby cradles in your region.

By carefully following these instructions and prioritizing safety, you can create a beautiful and functional handcrafted cradle for your baby. Remember that this is a complex project, and seeking assistance from an experienced woodworker may be beneficial, particularly for beginners. Always err on the side of caution to ensure the safety and well-being of your child.

Comprehensive Guide to Free Woodworking Cabinet Plans

This document provides detailed, step-by-step instructions for constructing various types of cabinets using readily available free woodworking plans. These plans are designed to be adaptable to different skill levels, ranging from beginner to intermediate. However, a basic understanding of woodworking tools and safety procedures is assumed. Always prioritize safety and wear appropriate personal protective equipment (PPE) throughout the construction process.

I. Choosing Your Cabinet Project

Before embarking on your cabinet-making journey, it’s crucial to select a project that aligns with your skill level and available resources. Numerous free woodworking plans are available online, catering to a wide spectrum of cabinet types and complexities. Consider the following factors:

A. Cabinet Type

The type of cabinet significantly impacts the complexity of the project. Simple projects include:

  • Basic Shaker-style cabinets: These cabinets feature simple, clean lines and are ideal for beginners.
  • Floating shelves: Relatively straightforward projects that provide excellent practice with joinery techniques.
  • Small storage units: Perfect for honing skills before tackling larger, more intricate projects.

More complex projects include:

  • Detailed face-frame cabinets: Require more precise measurements and joinery skills.
  • Built-in cabinets: Often involve custom sizing and integration with existing structures.
  • Tall pantry cabinets: Demand careful planning and sturdy construction to support significant weight.

B. Wood Selection

The choice of wood greatly influences the final appearance and durability of your cabinets. Common choices include:

  • Pine: An affordable and readily available softwood, relatively easy to work with.
  • Oak: A durable hardwood, offering a classic and elegant look. Can be more challenging to work with.
  • Maple: A strong hardwood, known for its smooth texture and light color. Can also be more challenging to work with.
  • Birch: A relatively hard and strong wood, offering excellent durability.

Consider factors such as budget, desired aesthetic, and the wood's workability when making your selection. Always select appropriately dried lumber to minimize warping and cracking during construction.

II. Essential Tools and Materials

Having the correct tools and materials readily available is critical for a successful woodworking project. While the specific requirements will vary based on the chosen plan, the following list represents a common core set:

A. Tools

  • Measuring tape: Accurate measurements are fundamental to cabinet construction.
  • Pencil: For marking cuts and outlines.
  • Hand saw or circular saw: For cutting lumber to size.
  • Chisels: For fine-tuning cuts and shaping.
  • Drill and drill bits: For creating pilot holes and driving screws.
  • Screwdriver (or impact driver): For fastening cabinet components.
  • Clamps: Essential for holding components together during assembly.
  • Safety glasses and hearing protection: Absolutely crucial for protecting your eyes and hearing.
  • Sandpaper (various grits): For smoothing surfaces and edges.
  • Wood glue: For creating strong and durable joints.
  • Finishing tools (brushes, rags): For applying stain, paint, or varnish.

B. Materials

  • Wood lumber: The quantity and type will depend on your chosen plan.
  • Wood screws: Appropriate size and type for the chosen wood.
  • Wood glue: A high-quality wood adhesive is essential.
  • Finishing materials (stain, paint, varnish): Choose according to your aesthetic preference.
  • Hardware (hinges, handles, knobs): Select based on the cabinet design and personal preference.

III. Step-by-Step Construction Process

The following steps provide a general framework for cabinet construction. Specific instructions will vary depending on the chosen plan. Always refer to your chosen plan for precise dimensions and techniques.

A. Cutting the Lumber

Accurately cut the lumber to the dimensions specified in your chosen plan. Use a measuring tape and pencil to mark the cutting lines. Employ a miter saw or hand saw, ensuring clean, precise cuts. Remember to account for the thickness of the saw blade when marking your cuts.

B. Assembly

Following the plan's instructions, assemble the cabinet components. This may involve various joinery techniques, such as rabbet joints, dado joints, or simple butt joints. Apply wood glue to joints and clamp firmly until the glue is dry. Pre-drill pilot holes before driving screws to prevent wood splitting.

C. Finishing

Once the cabinet is assembled, sand all surfaces smooth using sandpaper of progressively finer grits. Clean the cabinet thoroughly to remove sawdust. Apply your chosen finish (stain, paint, or varnish) according to the manufacturer's instructions. Multiple coats may be necessary for optimal protection and appearance. Allow adequate drying time between coats.

D. Hardware Installation

Finally, install the chosen hardware, such as hinges, handles, and knobs. Ensure that the hardware is properly aligned and securely fastened. Take your time with this step to ensure a professional-looking finish.

IV. Safety Precautions

Woodworking involves inherent risks. Always prioritize safety by adhering to the following precautions:

  • Wear appropriate safety glasses: Protect your eyes from flying debris.
  • Use hearing protection: Reduce noise exposure, especially when using power tools.
  • Keep your work area clean and organized: Reduce the risk of accidents.
  • Use clamps to secure workpieces: Prevent injuries from sudden movements.
  • Disconnect power tools before making adjustments: Prevent accidental starts.
  • Never operate machinery while fatigued or under the influence of drugs or alcohol: Maintain focus and alertness.
  • Properly dispose of sawdust and other woodworking waste: Maintain a clean and safe environment.

By carefully following these steps and prioritizing safety, you can successfully build high-quality cabinets using readily available free woodworking plans. Remember that patience and attention to detail are key to achieving professional-looking results.

Modern Crib Woodworking Plans: Minimalist & Clean Designs

Hey there, fellow woodworking enthusiasts! So, you're thinking about building a crib? That's awesome! There's something incredibly rewarding about crafting something so special for your little one. And let's face it, store-bought cribs can be… well, pricey. Plus, building your own lets you customize the design to perfectly match your nursery's aesthetic. This guide is all about creating a gorgeous, modern crib with clean lines and a minimalist vibe. We'll walk through the whole process, from design considerations to the final sanding. Let's dive in!

Choosing Your Design: Minimalist Meets Safe

Before you even pick up a saw, it's crucial to nail down your design. Minimalist doesn't mean flimsy! Safety is paramount when it comes to cribs. We're talking about meeting (and exceeding!) all relevant safety standards. That means considering things like slat spacing, mattress support, and overall sturdiness.

Here are some key design elements to think about for your minimalist crib:

  • Straight lines and simple shapes: Think clean lines, avoiding fussy details. A rectangular frame with straight slats is a classic minimalist choice.
  • Solid wood selection: Opt for hardwoods like maple, cherry, or oak for durability and a beautiful natural finish. They're strong enough to handle the daily wear and tear a crib endures.
  • Low profile design: A lower-to-the-ground design often feels more modern and can make it easier for parents to reach in and soothe their baby.
  • Adjustable mattress height: While not strictly minimalist, the ability to adjust the mattress height as your baby grows is a huge plus (and adds to the crib's longevity).
  • Concealed hardware: Keep the hardware clean and simple, ideally hidden or recessed to maintain that sleek, minimalist look.

Gathering Your Materials and Tools

Alright, let's get organized! Building a crib requires precision, so having all your materials and tools ready will make the process smoother. Here's a basic list. Remember to adjust quantities based on your specific design:

  • Wood: Hardwood lumber (maple, cherry, oak â€" your choice!), cut to the dimensions specified in your plans. Don't skimp on quality here!
  • Wood glue:** A high-quality wood glue is essential for strong joints.
  • Screws:** Use screws specifically designed for wood, and choose lengths appropriate for the thickness of your lumber.
  • Wood dowels (optional): These can add extra strength to certain joints.
  • Sandpaper:** Various grits for smoothing the wood (starting with coarser grits and ending with finer ones).
  • Finish:** Your choice of stain, paint, or clear sealant. Consider a non-toxic, child-safe finish.
  • Measuring tape and square:** Accurate measurements are crucial for a well-built crib.
  • Drill:** A drill with various drill bits.
  • Screwdriver:** A good quality screwdriver (or a drill with a screwdriver bit) is essential.
  • Safety glasses and dust mask:** Protect yourself from flying debris and wood dust.
  • Clamps:** Many clamps of varying sizes to hold pieces together while the glue dries.
  • Planer (optional): A planer can help ensure perfectly flat surfaces.

Step-by-Step Construction: A General Outline

This part is where things get really specific, and I can't provide exact instructions without a detailed plan. However, I can give you a general overview of the process. Remember, always refer to your chosen plans for precise measurements and techniques.

Building the Frame

Most crib designs start with building the main frame. This typically involves assembling the headboard, footboard, and side rails. You'll likely use mortise and tenon joints, pocket holes, or a combination of techniques. Make sure your joints are tight and secure. Always double-check your measurements and alignment before securing any joints permanently.

Adding the Slats

Once the frame is built, you'll add the slats. This is where you need to pay close attention to safety regulations regarding slat spacing. The space between slats must be small enough to prevent your baby from getting their head or body stuck. Your plans will specify the correct spacing.

Attaching the Mattress Support

The mattress support is critical. It needs to be sturdy and level to ensure a safe sleeping surface. Many cribs use adjustable mattress supports, allowing you to lower the mattress as your child grows. Follow your plans carefully for this part.

Finishing Touches

Once the crib is assembled, it's time for sanding and finishing. Sand all surfaces thoroughly, starting with coarser grits and moving to finer ones, to achieve a smooth finish. Apply your chosen finish â€" stain, paint, or sealant â€" according to the manufacturer's instructions. Make sure your finish is child-safe and non-toxic.

Safety First: Crucial Considerations

I cannot stress this enough: Safety is your top priority. Before you even think about letting your little one anywhere near the crib, make sure it meets all relevant safety standards. Here are some key points:

  • Slat spacing:** Check and double-check your slat spacing to ensure it conforms to safety regulations. This is crucial to prevent your baby from getting trapped.
  • Hardware:** Use appropriate hardware (screws, etc.) and make sure they are securely fastened. Consider countersinking screws to avoid any sharp edges.
  • Stability:** The crib must be rock-solid and stable. There should be no wobbling or movement.
  • Finish:** Use a non-toxic, child-safe finish that is free from harmful chemicals.
  • Mattress:** Ensure that you use a properly fitting mattress that does not leave gaps between the mattress and the crib rails.

Consider consulting with a professional if you have any doubts about the safety of your crib.

Commonly Asked Questions

  • Q: Where can I find plans for a minimalist crib? A: You can find plans online through various woodworking websites and blogs. Etsy is also a great resource for both plans and pre-made crib kits. Remember to thoroughly check the safety of any plan before starting construction.
  • Q: What kind of wood is best for a crib? A: Hardwoods like maple, cherry, and oak are ideal for their durability and strength. Avoid softer woods that might be easily damaged.
  • Q: How long does it take to build a crib? A: The time required varies depending on your experience level and the complexity of the plan. Expect to spend several days, perhaps a week or more, depending on your schedule.
  • Q: Do I need any special tools? A: A good quality drill, measuring tape, clamps, and sandpaper are essential. A planer and other more advanced woodworking tools can be helpful, but aren't strictly necessary.
  • Q: Is it really safe to build my own crib? A: Building your own crib can be perfectly safe, provided you follow detailed, reputable plans and pay close attention to safety regulations. If you have any doubts, consult a professional before starting.

Building a crib is a big project, but the sense of accomplishment and the satisfaction of creating something beautiful and safe for your baby are truly priceless. Happy building!

Rustic Crib Woodworking: Building a Cozy Nursery Haven

Hey there, fellow DIY enthusiasts and soon-to-be parents! So you're dreaming of a rustic nursery, filled with the warmth of natural wood and the comforting scent of freshly-planed lumber? That's awesome! Building a rustic crib yourself is a fantastic way to add a truly unique and personal touch to your little one's room. It's a labor of love, sure, but the end result? Priceless. Let's dive into some ideas to get those creative woodworking juices flowing!

Choosing Your Wood and Style

The first big decision is picking your wood. Think about the overall feel you want. Are we going for a rugged, reclaimed look? Something a little more refined and elegant, still rustic, but a bit more polished? The wood choice hugely influences the final aesthetic.

Popular Rustic Wood Choices:

  • Reclaimed wood: This adds serious character. Think old barn wood, repurposed pallets (ensure they're treated properly!), or even reclaimed flooring. The imperfections, knots, and variations in color tell a story. Just be sure to check for any potential hazards before using reclaimed wood in a crib.
  • Pine: A classic choice for its affordability, workability, and slightly rustic feel. Knotty pine adds even more character. It's relatively soft, so handle with care to avoid dents and scratches during construction and use.
  • Oak: For a more durable and refined rustic look, oak is a strong contender. It’s harder than pine, meaning it'll stand up to the wear and tear of a growing child. White oak is particularly beautiful, though it’s a bit more expensive.
  • Cedar: The natural scent of cedar is wonderfully calming and insect-repellent, making it a popular choice for nurseries. It's also fairly durable and has a lovely grain. Note that it can be a little more challenging to work with than pine.

Beyond the wood type, consider the style. Do you envision a simple, Shaker-inspired crib with clean lines? Or something more elaborate, perhaps with carved details or unique joinery? Browse online for inspiration â€" Pinterest is a goldmine for rustic crib designs!

Design Considerations for Safety

Safety is paramount when building a crib. This isn't a project to take lightly. You absolutely must adhere to all relevant safety standards for cribs. This includes slat spacing, mattress support firmness, and overall structural integrity.

Crucial Safety Aspects:

  • Slat Spacing: The distance between crib slats must be between 2 3/8 inches and 2 3/4 inches to prevent your baby’s head from getting stuck.
  • Mattress Support: The mattress support must be firm and level to prevent suffocation. Avoid any sagging or gaps.
  • Hardware: Use only high-quality, child-safe hardware. Screws should be countersunk and smooth to prevent injury.
  • Finishes: Use only non-toxic, child-safe finishes and paints. Look for products labeled as specifically safe for cribs and children's toys. Always follow the manufacturer's instructions carefully and allow adequate drying time before assembly.
  • Sharp edges and corners: Ensure all edges and corners are smooth and rounded to avoid injuries. Sand everything thoroughly!

Consider consulting with a qualified carpenter or woodworker if you’re unsure about any aspect of the construction process. It's better to be safe than sorry when it comes to your baby's safety. Don’t hesitate to seek expert advice!

Adding Rustic Charm: Design Ideas

Now for the fun part: infusing your crib with rustic charm! Here are some ideas to elevate your design beyond the basics:

Rustic Design Elements:

  • Distressed Finish: A slightly weathered or distressed finish can add a beautiful aged look. You can achieve this with various techniques, from sanding to applying a special distressing stain.
  • Wood Burning: Intricate wood-burned designs can add a personalized touch. Consider adding your baby's name, birthdate, or a simple nature-inspired motif.
  • Metal Accents: Incorporate rustic metal accents, like antique-style hinges or drawer pulls, for a touch of contrast and visual interest.
  • Natural Fabrics: Pair your rustic crib with natural fabrics like linen or cotton for bedding and blankets. These will complement the wood beautifully and create a warm, inviting atmosphere.
  • Unique Joiners: Explore different joinery techniques like mortise and tenon or dovetail joints. These add strength and a visually interesting element to your design.

Building Your Crib: A Step-by-Step (Simplified) Approach

This is a simplified overview, remember â€" detailed plans are essential for building a safe and sturdy crib. You’ll need detailed plans, appropriate tools (table saw, planer, router, etc.), and a solid understanding of woodworking techniques.

  1. Plan and Design: Acquire detailed plans that meet all safety standards. Don’t skip this step!
  2. Cut the Wood: Precisely cut all your wood pieces according to the plans.
  3. Assemble the Frame: Carefully assemble the crib frame, using appropriate joinery and hardware.
  4. Install Slats: Secure the slats to the frame, ensuring proper spacing.
  5. Attach Mattress Support: Install a sturdy and level mattress support.
  6. Sanding and Finishing: Thoroughly sand all surfaces to remove splinters and burrs. Apply a child-safe finish.
  7. Final Inspection: Before letting your baby sleep in it, conduct a thorough final inspection to ensure everything is safe and secure.

Commonly Asked Questions

Let's address some common queries about building a rustic crib:

  • Q: Is it really safe to build a crib myself? A: Yes, but only if you follow detailed plans, adhere strictly to safety standards, and possess the necessary woodworking skills. If you have any doubts, seek expert help.
  • Q: How long does it take to build a rustic crib? A: This depends on your skill level and the complexity of the design. Expect to spend several days, possibly even weeks, on the project.
  • Q: How much will it cost? A: The cost varies based on the wood type, hardware, and finish you choose. It can be cheaper than buying a commercially made crib, but factor in the cost of materials and tools.
  • Q: Where can I find plans? A: You can find plans online, in woodworking magazines, or from specialized woodworking stores. Ensure the plans meet all safety standards.
  • Q: What if I make a mistake? A: Mistakes happen! Carefully assess the error. Sometimes, small mistakes are easily fixable. If it's a major issue, don't hesitate to seek advice or start over.

Building a rustic crib is a challenging but rewarding project. Remember to prioritize safety and take your time. The result will be a beautiful and unique piece of furniture that you and your little one will cherish for years to come. Happy building!

Maximizing Vertical Space: A Comprehensive Guide to Efficient Floating Shelf Designs

In contemporary interior design, the strategic utilization of vertical space is paramount. Limited floor area necessitates creative solutions to accommodate storage and display needs. Floating shelves, with their elegant aesthetic and space-saving capabilities, present a versatile answer to this challenge. This comprehensive guide explores diverse floating shelf designs, emphasizing their efficiency in optimizing vertical real estate while enhancing the overall visual appeal of a room.

Understanding the Advantages of Floating Shelves

Floating shelves offer numerous advantages over traditional shelving units. Their streamlined profile contributes to a sense of spaciousness, particularly in smaller rooms. The absence of visible supports creates a clean, modern look that complements a wide range of interior styles, from minimalist to eclectic. Furthermore, floating shelves:

  • Maximize vertical space: They utilize wall space often left unused, providing additional storage and display areas without encroaching on floor space.
  • Enhance visual appeal: Their sleek design adds a contemporary touch and can serve as a focal point in a room, showcasing cherished items or artwork.
  • Offer design flexibility: Floating shelves are available in various materials, sizes, and finishes, allowing for customization to suit individual preferences and décor.
  • Easy installation: While professional installation is recommended for larger or heavier units, many floating shelves are designed for simple DIY installation.
  • Versatile functionality: They can serve as bookshelves, display shelves for decorative objects, storage for media devices, or even as a stylish alternative to a bedside table.

Categorizing Floating Shelf Designs for Optimized Space Use

The effectiveness of floating shelves in maximizing vertical space depends significantly on their design and placement. Several categories of floating shelf designs cater to specific needs and aesthetic preferences:

Single-Tier Floating Shelves

These are the simplest form of floating shelves, ideal for smaller spaces or areas needing only minimal storage. Their compact size allows for strategic placement above desks, in hallways, or even in bathrooms for toiletries. The minimal design ensures they don't overwhelm the space while providing a functional surface.

Multi-Tiered Floating Shelves

For increased storage capacity, multi-tiered floating shelves are an excellent option. These designs stack multiple shelves vertically, creating a significant storage solution in a relatively small wall area. Careful consideration should be given to the spacing between tiers to allow for easy access and to prevent the shelves from feeling cluttered.

Corner Floating Shelves

Corner floating shelves ingeniously utilize often-neglected corner spaces. These shelves are specifically designed to fit snugly into corners, maximizing the utilization of otherwise unused areas. They can add visual interest to a room while providing additional storage, particularly useful in smaller rooms or apartments.

L-Shaped and U-Shaped Floating Shelves

L-shaped and U-shaped floating shelves offer a more substantial storage solution than single-tier options. They maximize wall space by extending along two adjacent walls, creating a larger surface area for storage and display. This design is particularly suitable for living rooms, home offices, or bedrooms where substantial storage is required.

Floating Shelves with Integrated Features

Some advanced designs incorporate integrated features to enhance functionality. Examples include shelves with built-in lighting, creating a dramatic display effect for collectibles or books. Others may incorporate hidden compartments or drawers for increased storage capacity, concealing items while maintaining the sleek aesthetic of the floating shelf.

Materials and Finishes: Impact on Design and Efficiency

The choice of materials and finishes significantly impacts the overall look and functionality of floating shelves. Different materials offer various levels of durability, aesthetic appeal, and weight-bearing capacity:

  • Wood: A classic and versatile choice, offering warmth and natural beauty. Different wood types, finishes, and stains allow for customization to match any interior style.
  • Metal: Offers a modern and industrial aesthetic. Metal shelves are typically sturdy and durable but require careful consideration of the weight capacity.
  • Glass: Creates a sleek and minimalist look, perfect for modern interiors. Glass shelves allow light to pass through, making them ideal for showcasing decorative objects.
  • Acrylic: A lightweight and transparent option offering a modern and clean aesthetic. Acrylic shelves are durable and easy to clean.

The finish further enhances the shelf's aesthetic appeal and durability. Options include stained wood, painted finishes, powder-coated metal, and polished glass. The chosen finish should complement the overall décor of the room.

Strategic Placement and Arrangement for Optimal Space Utilization

The strategic placement and arrangement of floating shelves are crucial for maximizing their space-saving potential. Consider the following factors:

  • Wall space assessment: Identify areas with ample wall space that are not already occupied by furniture or other fixtures.
  • Visual balance: Distribute shelves evenly to create a balanced and visually appealing arrangement. Avoid overcrowding a single area.
  • Accessibility: Ensure shelves are placed at a comfortable height for easy access and retrieval of items.
  • Weight capacity: Select shelves with appropriate weight capacity to prevent overloading and potential damage.
  • Room functionality: Consider the room's purpose when placing shelves. For example, in a kitchen, place shelves within reach for frequently used items.

Conclusion: Elevating Interior Design with Efficient Floating Shelves

Floating shelves represent a powerful design solution for maximizing vertical space and enhancing the aesthetic appeal of any room. By understanding the various design options, material choices, and strategic placement techniques, homeowners and interior designers can leverage these versatile elements to create functional and visually stunning interiors. The careful consideration of design, material, and placement allows floating shelves to transcend mere storage solutions, transforming into elegant focal points and integral components of a well-designed living space.